


Not all datasets will contain every section shown in the above picture.
Examples and tutorials
Options
Equity options: Introduction
Options on futures: Introduction
All options with a given underlying
Join options with underlying prices
US equity options volume by venue
Resample US equity options NBBO
Estimate implied volatility
Get symbols for 0DTE options
Daily statistics for equity options
Get end of day option spreads
Historical data
Programmatic batch downloads
Best bid, best offer, and midprice
Custom OHLCV bars from trades
Join schemas on instrument ID
Plot a candlestick chart
Calculate VWAP and RSI
End-of-day pricing and portfolio valuation
Benchmark portfolio performance
Market halts, volatility interrupts, and price bands
Resample OHLCV from 1-minute to 5-minute
Convert DBN to other encoding formats
Request a large number of symbols
Algorithmic trading
A high-frequency liquidity-taking strategy
Build prediction models with machine learning
Execution slippage and markouts
Matching engine latencies
Using messaging rates as a proxy for implied volatility
Mean reversion and portfolio optimization
Pairs trading based on cointegration
Build a real-time stock screener
Core concepts
Venues and datasets
Blue Ocean ATS MEMOIR Depth
Cboe BYX Depth
Cboe BZX Depth
Cboe EDGA Depth
Cboe EDGX Depth
CFE
CME Globex MDP 3.0
Databento US Equities Mini
Databento US Equities Summary
Eurex
European Energy Exchange
ICE Endex
ICE Europe Commodities
ICE Europe Financials
ICE Futures US
IEX TOPS
MEMX MEMOIR Depth
MIAX Pearl Depth of Market
Nasdaq Basic with NLS Plus
Nasdaq TotalView-ITCH
Nasdaq Texas TotalView-ITCH
Nasdaq PSX TotalView-ITCH
NYSE Integrated
NYSE American Integrated
NYSE Arca Integrated
NYSE National Trades and BBO
NYSE Texas Integrated
OPRA
Adjustment factors
Corporate actions
Security master
API Reference
Resources
Release notes
C++
0.60.0 - 2026-06-16
0.59.0 - 2026-06-02
0.58.0 - 2026-05-26
0.57.0 - 2026-05-12
0.56.0 - 2026-05-05
0.55.0 - 2026-04-28
0.54.0 - 2026-04-21
0.53.0 - 2026-04-08
0.52.0 - 2026-03-31
0.51.0 - 2026-03-17
0.50.0 - 2026-03-03
0.49.0 - 2026-02-24
0.48.0 - 2026-02-18
0.47.0 - 2026-02-04
0.46.1 - 2026-01-27
0.46.0 - 2026-01-20
0.45.0 - 2025-12-10
0.44.0 - 2025-11-18
0.43.0 - 2025-10-22
0.42.0 - 2025-08-19
0.41.0 - 2025-08-12
0.40.0 - 2025-07-29
0.39.1 - 2025-07-22
0.39.0 - 2025-07-15
0.38.2 - 2025-07-01
0.38.1 - 2025-06-25
0.38.0 - 2025-06-10
0.37.1 - 2025-06-03
0.37.0 - 2025-06-03
0.36.0 - 2025-05-27
0.35.1 - 2025-05-20
0.35.0 - 2025-05-13
0.34.2 - 2025-05-06
0.34.1 - 2025-04-29
0.34.0 - 2025-04-22
0.33.0 - 2025-04-15
0.32.1 - 2025-04-07
0.32.0 - 2025-04-02
0.31.0 - 2025-03-18
0.30.0 - 2025-02-11
0.29.0 - 2025-02-04
0.28.0 - 2025-01-21
0.27.0 - 2025-01-07
0.26.0 - 2024-12-17
0.25.0 - 2024-11-12
0.24.0 - 2024-10-22
0.23.0 - 2024-09-25
0.22.0 - 2024-08-27
0.21.0 - 2024-07-30
0.20.1 - 2024-07-16
0.20.0 - 2024-07-09
0.19.1 - 2024-06-25
0.19.0 - 2024-06-04
0.18.1 - 2024-05-22
0.18.0 - 2024-05-14
0.17.1 - 2024-04-08
0.17.0 - 2024-04-01
0.16.0 - 2024-03-01
0.15.0 - 2024-01-16
0.14.1 - 2023-12-18
0.14.0 - 2023-11-23
0.13.1 - 2023-10-23
0.13.0 - 2023-09-21
0.12.0 - 2023-08-24
0.11.0 - 2023-08-10
0.10.0 - 2023-07-20
0.9.1 - 2023-07-11
0.9.0 - 2023-06-13
0.8.0 - 2023-05-16
0.7.0 - 2023-04-28
0.6.1 - 2023-03-28
0.6.0 - 2023-03-24
0.5.0 - 2023-03-13
0.4.0 - 2023-03-02
0.3.0 - 2023-01-06
0.2.0 - 2022-12-01
0.1.0 - 2022-11-07
Python
0.80.0 - TBD
0.79.0 - 2026-06-02
0.78.0 - 2026-05-12
0.77.0 - 2026-04-28
0.76.0 - 2026-04-21
0.75.0 - 2026-04-07
0.74.1 - 2026-03-31
0.74.0 - 2026-03-24
0.73.0 - 2026-03-10
0.72.0 - 2026-02-26
0.71.0 - 2026-02-17
0.70.0 - 2026-01-27
0.69.0 - 2026-01-13
0.68.2 - 2026-01-06
0.68.1 - 2025-12-16
0.68.0 - 2025-12-09
0.67.0 - 2025-12-02
0.66.0 - 2025-11-18
0.65.0 - 2025-11-11
0.64.0 - 2025-09-30
0.63.0 - 2025-09-02
0.62.0 - 2025-08-19
0.61.0 - 2025-08-12
0.60.0 - 2025-08-05
0.59.0 - 2025-07-15
0.58.0 - 2025-07-08
0.57.1 - 2025-06-17
0.57.0 - 2025-06-10
0.56.0 - 2025-06-03
0.55.1 - 2025-06-02
0.55.0 - 2025-05-29
0.54.0 - 2025-05-13
0.53.0 - 2025-04-29
0.52.0 - 2025-04-15
0.51.0 - 2025-04-08
0.50.0 - 2025-03-18
0.49.0 - 2025-03-04
0.48.0 - 2025-01-21
0.47.0 - 2024-12-17
0.46.0 - 2024-12-10
0.45.0 - 2024-11-12
0.44.1 - 2024-10-29
0.44.0 - 2024-10-22
0.43.1 - 2024-10-15
0.43.0 - 2024-10-09
0.42.0 - 2024-09-23
0.41.0 - 2024-09-03
0.40.0 - 2024-08-27
0.39.3 - 2024-08-20
0.39.2 - 2024-08-13
0.39.1 - 2024-08-13
0.39.0 - 2024-07-30
0.38.0 - 2024-07-23
0.37.0 - 2024-07-09
0.36.3 - 2024-07-02
0.36.2 - 2024-06-25
0.36.1 - 2024-06-18
0.36.0 - 2024-06-11
0.35.0 - 2024-06-04
0.34.1 - 2024-05-21
0.34.0 - 2024-05-14
0.33.0 - 2024-04-16
0.32.0 - 2024-04-04
0.31.1 - 2024-03-20
0.31.0 - 2024-03-05
0.30.0 - 2024-02-22
0.29.0 - 2024-02-13
0.28.0 - 2024-02-01
0.27.0 - 2024-01-23
0.26.0 - 2024-01-16
0.25.0 - 2024-01-09
0.24.1 - 2023-12-15
0.24.0 - 2023-11-23
0.23.1 - 2023-11-10
0.23.0 - 2023-10-26
0.22.1 - 2023-10-24
0.22.0 - 2023-10-23
0.21.0 - 2023-10-11
0.20.0 - 2023-09-21
0.19.1 - 2023-09-08
0.19.0 - 2023-08-25
0.18.1 - 2023-08-16
0.18.0 - 2023-08-14
0.17.0 - 2023-08-10
0.16.1 - 2023-08-03
0.16.0 - 2023-07-25
0.15.2 - 2023-07-19
0.15.1 - 2023-07-06
0.15.0 - 2023-07-05
0.14.1 - 2023-06-16
0.14.0 - 2023-06-14
0.13.0 - 2023-06-02
0.12.0 - 2023-05-01
0.11.0 - 2023-04-13
0.10.0 - 2023-04-07
0.9.0 - 2023-03-10
0.8.1 - 2023-03-05
0.8.0 - 2023-03-03
0.7.0 - 2023-01-10
0.6.0 - 2022-12-02
0.5.0 - 2022-11-07
0.4.0 - 2022-09-14
0.3.0 - 2022-08-30
HTTP API
0.36.0 - TBD
0.35.0 - 2025-08-19
0.34.1 - 2025-06-17
0.34.0 - 2025-06-09
0.33.0 - 2024-12-10
0.32.0 - 2024-11-26
0.31.0 - 2024-11-12
0.30.0 - 2024-09-24
0.29.0 - 2024-09-03
0.28.0 - 2024-06-25
0.27.0 - 2024-06-04
0.26.0 - 2024-05-14
0.25.0 - 2024-03-26
0.24.0 - 2024-03-06
0.23.0 - 2024-02-15
0.22.0 - 2024-02-06
0.21.0 - 2024-01-30
0.20.0 - 2024-01-18
0.19.0 - 2023-10-17
0.18.0 - 2023-10-11
0.17.0 - 2023-10-04
0.16.0 - 2023-09-26
0.15.0 - 2023-09-19
0.14.0 - 2023-08-29
0.13.0 - 2023-08-23
0.12.0 - 2023-08-10
0.11.0 - 2023-07-25
0.10.0 - 2023-07-06
0.9.0 - 2023-06-01
0.8.0 - 2023-05-01
0.7.0 - 2023-04-07
0.6.0 - 2023-03-10
0.5.0 - 2023-03-03
0.4.0 - 2022-12-02
0.3.0 - 2022-08-30
0.2.0 - 2021-12-10
0.1.0 - 2021-08-30
Raw API
0.9.1 - TBD
0.9.0 - 2026-04-26
0.7.5 - 2026-02-28
0.7.4 - 2026-02-15
0.7.3 - 2026-02-10
0.7.2 - 2025-12-14
0.7.1 - 2025-11-09
0.7.0 - 2025-10-26
0.6.4 - 2025-09-28
0.6.3 - 2025-09-07
0.6.2 - 2025-08-02
0.6.1 - 2025-06-29
0.6.0 - 2025-05-24
0.5.6 - 2025-04-06
0.5.5 - 2024-12-01
0.5.4 - 2024-10-02
0.5.3 - 2024-10-02
0.5.1 - 2024-07-24
2024-07-20
2024-06-25
0.5.0 - 2024-05-25
0.4.6 - 2024-04-13
0.4.5 - 2024-03-25
0.4.4 - 2024-03-23
0.4.3 - 2024-02-13
0.4.2 - 2024-01-06
0.4.0 - 2023-11-08
0.3.0 - 2023-10-20
0.2.0 - 2023-07-23
0.1.0 - 2023-05-01
Rust
0.53.0 - 2026-06-02
0.52.0 - 2026-05-26
0.51.0 - 2026-05-12
0.50.0 - 2026-05-05
0.49.0 - 2026-04-29
0.48.0 - 2026-04-21
0.47.0 - 2026-04-15
0.46.0 - 2026-04-07
0.45.0 - 2026-03-31
0.44.0 - 2026-03-17
0.43.0 - 2026-03-04
0.42.0 - 2026-02-24
0.41.0 - 2026-02-18
0.40.0 - 2026-01-27
0.39.0 - 2026-01-20
0.38.0 - 2025-12-16
0.37.0 - 2025-12-09
0.36.0 - 2025-11-19
0.35.0 - 2025-10-22
0.34.1 - 2025-09-30
0.34.0 - 2025-09-23
0.33.1 - 2025-08-26
0.33.0 - 2025-08-19
0.32.0 - 2025-08-12
0.31.0 - 2025-07-30
0.30.0 - 2025-07-22
0.29.0 - 2025-07-15
0.28.0 - 2025-07-01
0.27.1 - 2025-06-25
0.27.0 - 2025-06-10
0.26.2 - 2025-06-03
0.26.1 - 2025-05-30
0.26.0 - 2025-05-28
0.25.0 - 2025-05-13
0.24.0 - 2025-04-22
0.23.0 - 2025-04-15
0.22.0 - 2025-04-01
0.21.0 - 2025-03-18
0.20.0 - 2025-02-12
0.19.0 - 2025-01-21
0.18.0 - 2025-01-08
0.17.0 - 2024-12-17
0.16.0 - 2024-11-12
0.15.0 - 2024-10-22
0.14.1 - 2024-10-08
0.14.0 - 2024-10-01
0.13.0 - 2024-09-25
0.12.1 - 2024-08-27
0.12.0 - 2024-07-30
0.11.4 - 2024-07-16
0.11.3 - 2024-07-09
0.11.2 - 2024-06-25
0.11.1 - 2024-06-11
0.11.0 - 2024-06-04
0.10.0 - 2024-05-22
0.9.1 - 2024-05-15
0.9.0 - 2024-05-14
0.8.0 - 2024-04-01
0.7.1 - 2024-03-05
0.7.0 - 2024-03-01
0.6.0 - 2024-01-16
0.5.0 - 2023-11-23
0.4.2 - 2023-10-23
0.4.1 - 2023-10-06
0.4.0 - 2023-09-21
0.3.0 - 2023-09-13
0.2.1 - 2023-08-25
0.2.0 - 2023-08-10
0.1.0 - 2023-08-02
Data
2026-05-31
2026-05-09
2026-04-22
2026-04-15
2026-04-13
2026-04-08
2025-11-09
2025-11-04
2025-09-23
2025-08-26
2025-08-05
2025-07-25
2025-07-06
2025-07-01
2025-06-27
2025-06-17
2025-06-10
2025-05-20
2025-05-07
2025-04-05
2025-04-01
2025-03-13
2025-02-26
2025-02-01
2025-01-15
2024-12-14
2024-12-03
2024-12-02
2024-10-22
2024-10-24
2024-07-05
2024-06-25
2024-06-18
2024-05-07
2024-01-18
2023-11-17
2023-10-04
2023-08-29
2023-07-23
2023-05-01
2023-04-28
2023-03-07
Collapse all
 Portal
How to use the Databento portal and its features.
Data catalog
Overview
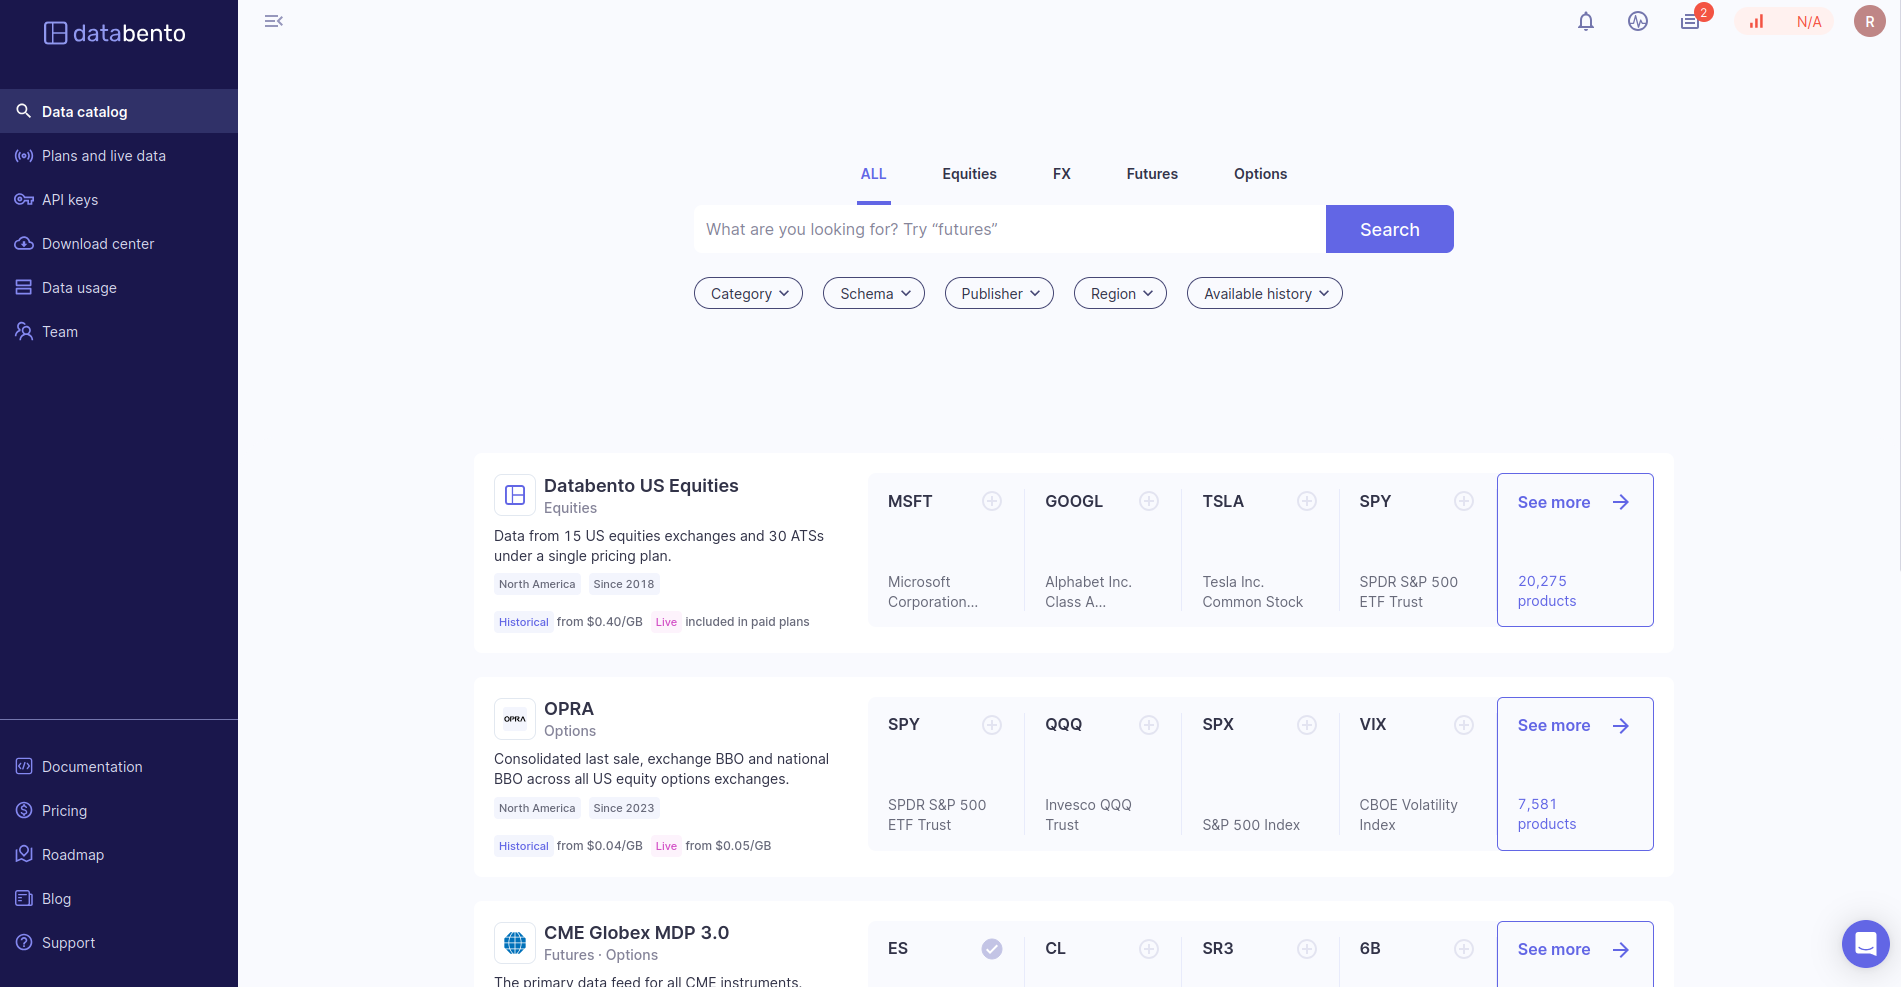
The data catalog is on the Browse page of your Databento portal. In addition, you can browse datasets from different exchanges, like CME and Nasdaq. Each dataset consists of products (read more about the definition of a product here).
Searching for products
You can also search for products on the Browse page by typing directly into the search bar. You can filter your results based on the following:
- Asset class. Search within equities, FX, futures, and options.
- Category. Search within raw market data, reference data, and textual data.
- Schema. Search within MBO, MBP, TBBO, Trades, and more. Learn more about our supported schemas here.
- Publisher. Search within venues (such as CME Globex, Nasdaq, OPRA) and vendors (for instance EDI).
- Region. Search within North America, Europe, and Asia.
- Available history. Search within ranges from one month to at least 3 years.
Clicking on a product in the results will take you to its Instrument details page
Dataset details page
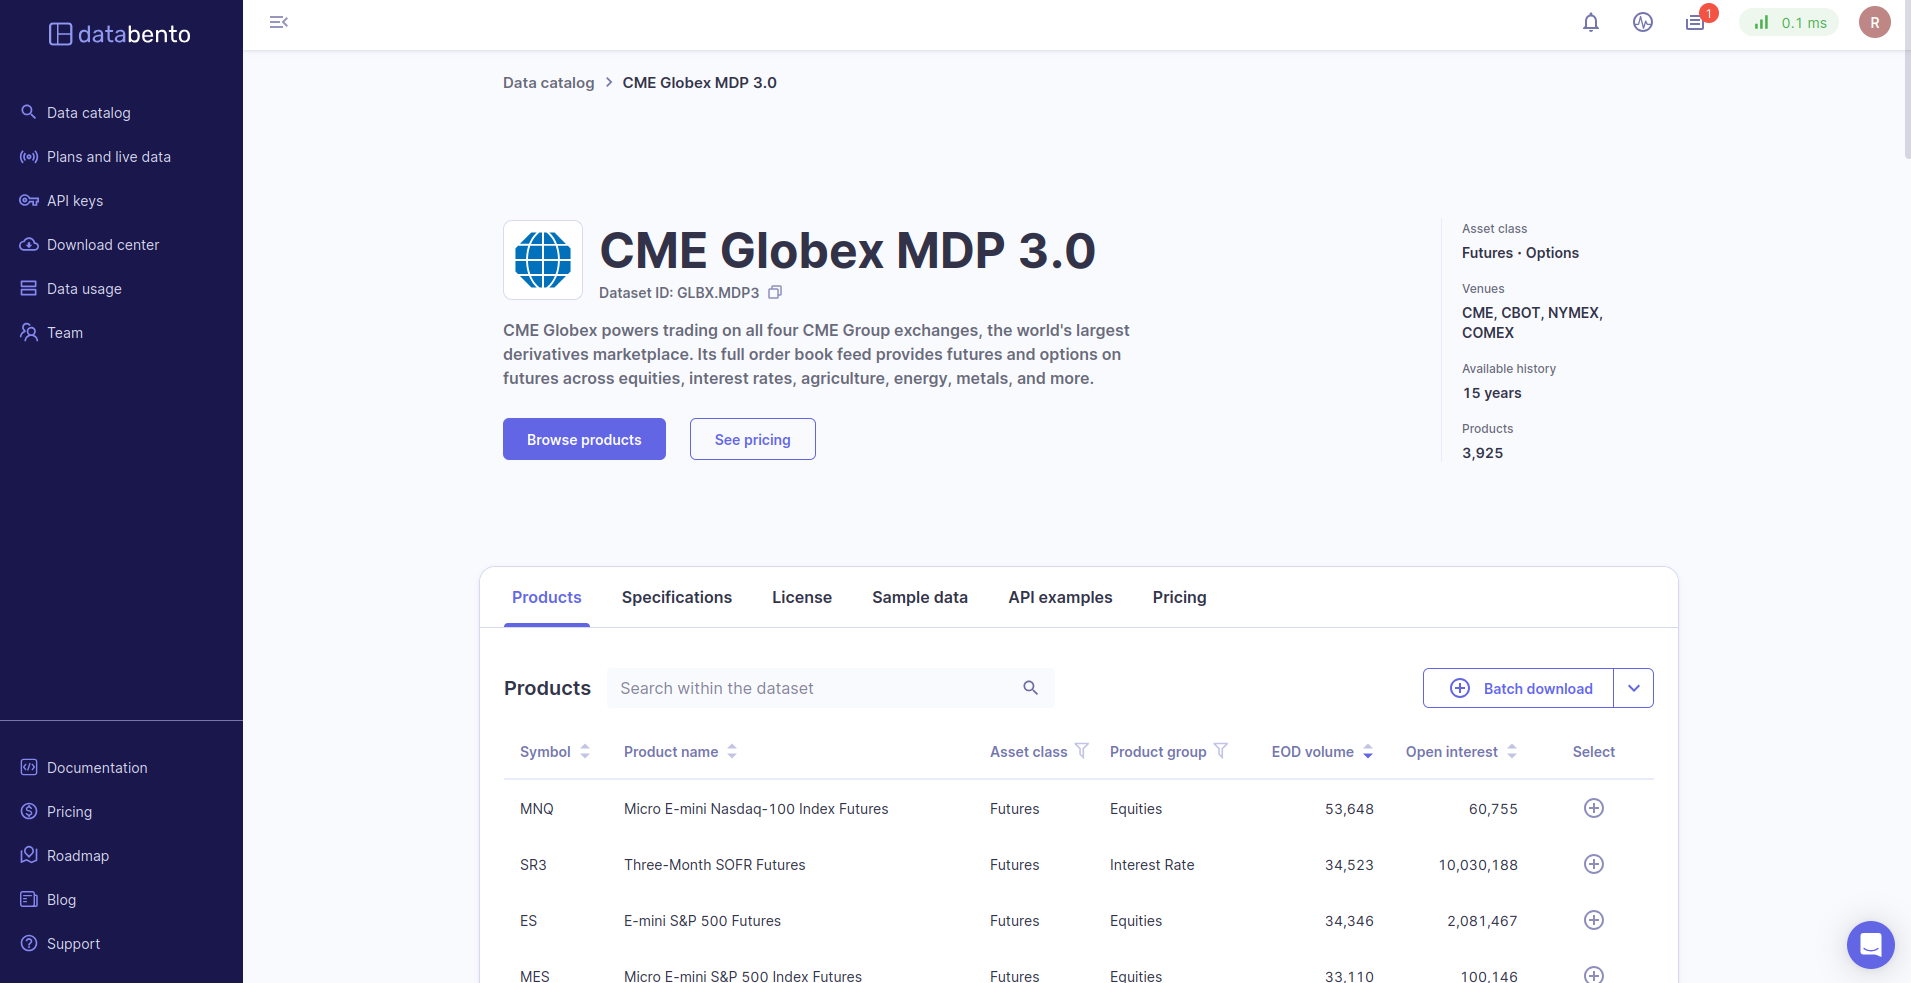
Info
Click on the dataset's icon to find each its details page. This page includes the following sections:
- Products. Includes details about the parent products available in the dataset. See Instruments and products for more information.
- Specifications. Includes details about the dataset — like its assets, region, market, schemas, encodings and capture origin.
- License. Includes information about any applicable licensing required to access this dataset.
- Sample data. Includes real data extracts for quality assurance. You can view these extracts in different schemas.
- API examples. Includes minimal examples of using the Historical API with this dataset.
- Pricing. Include a monthly pricing estimate, by schema, for both live and historical data. You can select the entire dataset, or select individual products.
InfoThe monthly prices shown in the pricing calculator are only estimates, calculated from data sizes over the previous 30 days. For more accurate pricing, see the metadata.get_cost method.
Searching within datasets
On each dataset's details page, you can also search for products within that dataset. Search for a symbol or product name directly in the search bar. You can also filter your results with the following:
- Asset class. Search within equities, FX, futures, and options.
- Product group. Filters include interest rates, equities, energy, agriculture, and more.
- EOD volume. Rank results by End-of-Day (EOD) volume.
- Open interest. Rank results by open interest.
Instrument details page
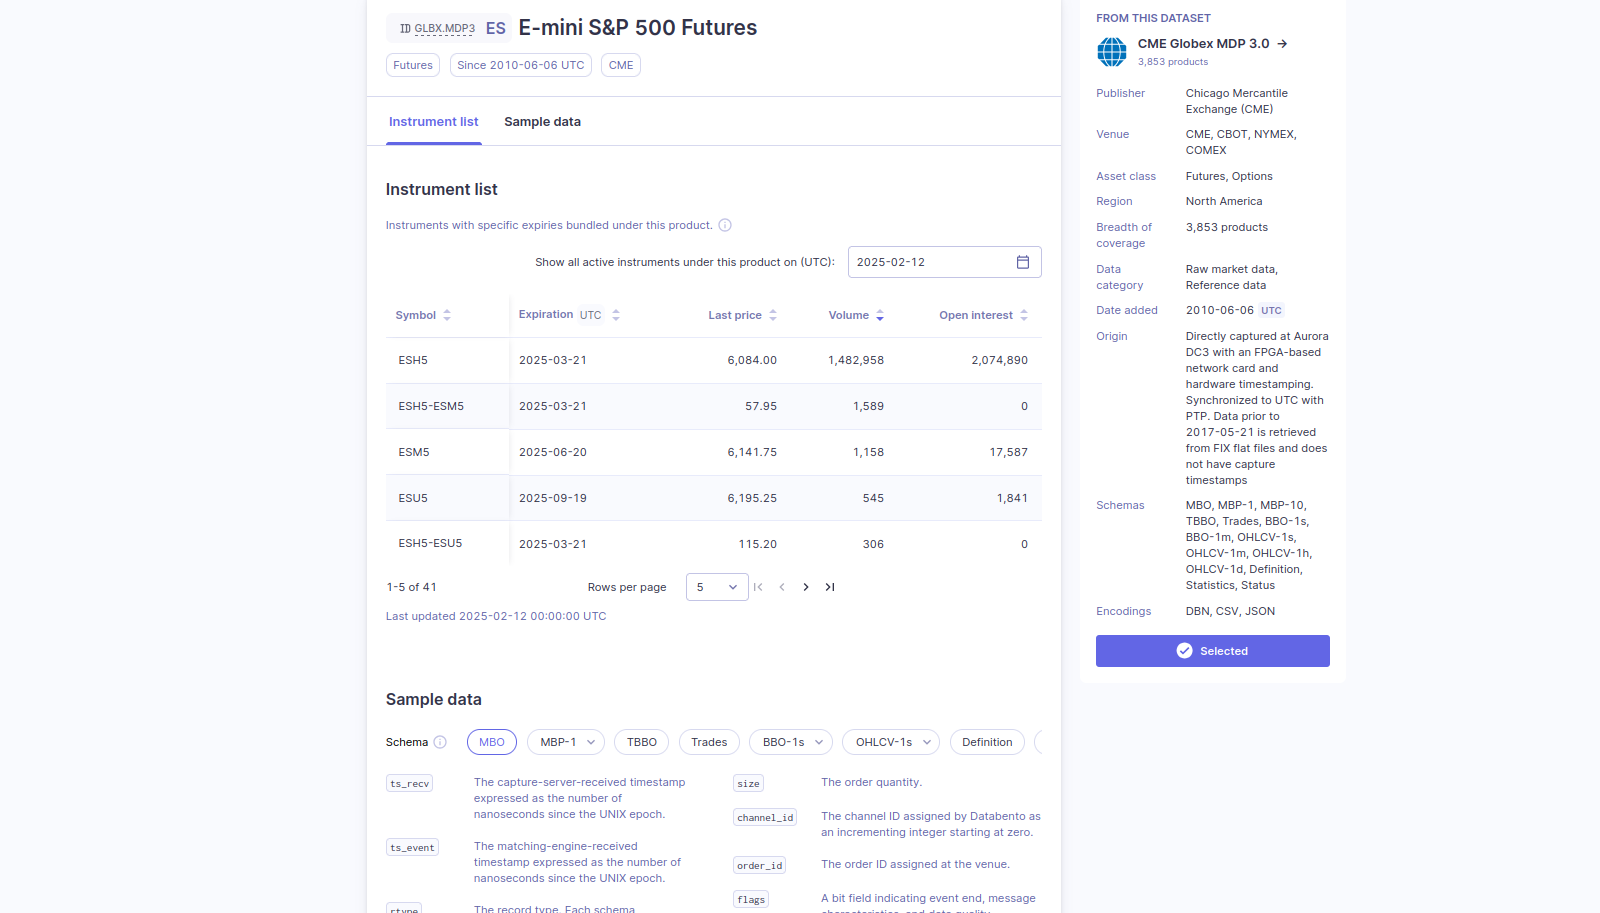
InfoA chart will appear in lieu of an instrument list when viewing equity products.
Click on a product to open up its instrument details page. This page includes the following sections:
- Instrument list. Instruments with specific expirations (or strikes) are bundled under this
parent product (for instance
ES).- You can choose to show all active instruments under this product on a specific date.
- You can sort the instrument list by symbol, expiration, last price, volume, and open interest.
- Sample data. You can view sample data for all available schemas in this dataset.
Batch download
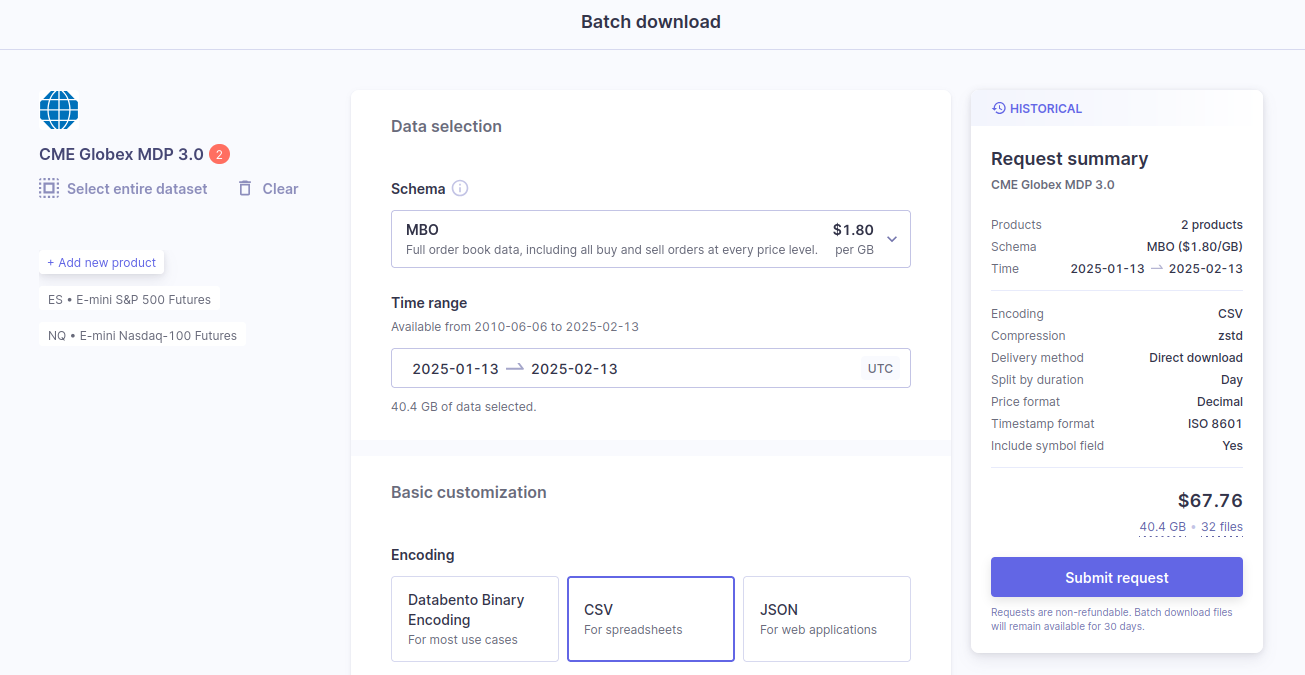
Overview
After you've selected a product from a dataset, you can customize and submit your download request for flat files. We support DBN, CSV, and JSON formats, allowing our data to be integrated with various platforms and database solutions.
InfoWithin one request, you can download multiple products from the same dataset — with no limit to the number of products. However, you can't download various products from different datasets within one request.
Data selection

- Schema. Specify the schema you want to receive your data in — MBO, MBP, TBBO, etc. You can read more about our supported schemas here. After you select a schema, we specify the usage rate ($/GB).
- Time range. You can specify your data time range. After you select a time range, we specify the data usage amount.
Basic customization
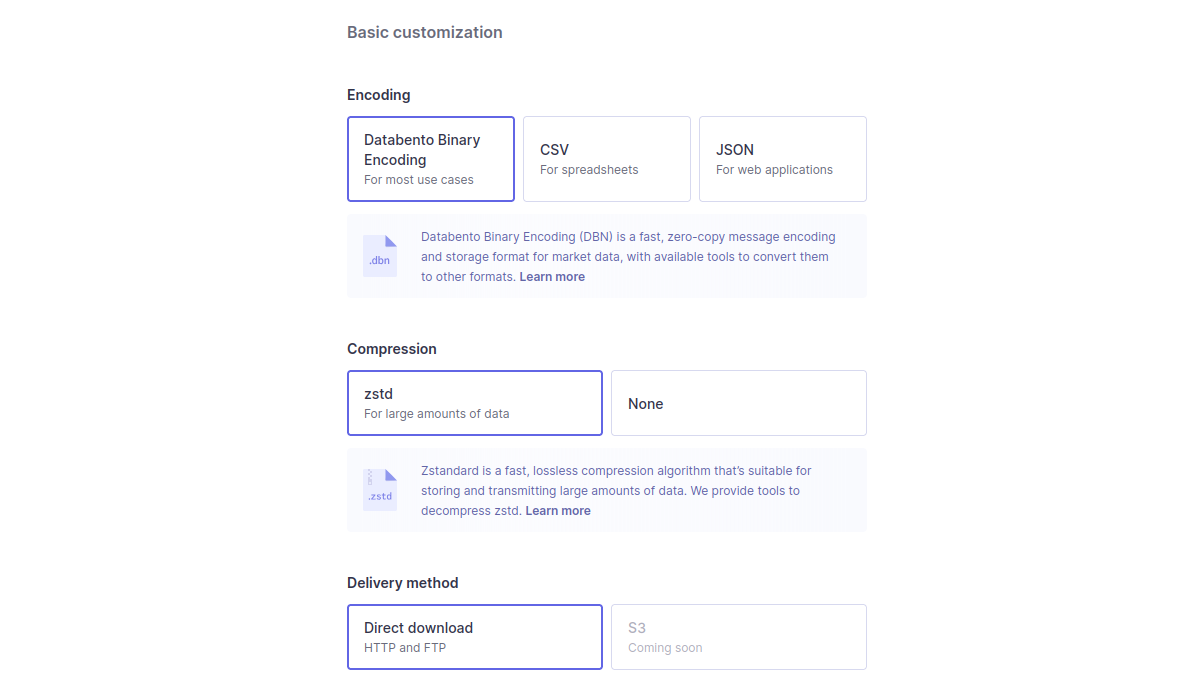
Choose your preferred encoding, compression, and delivery method for no additional charge.
- Encoding. DBN has the fastest transfer speed and smallest size. CSV works best for spreadsheets and JSON for web applications. Learn more about how to read DBN files here.
- Compression. Choose between zstd or no compression option. Learn more about how to decompress zstd files here.
- Delivery method. Direct download (HTTP or FTP) is currently the only option available, with S3 and disk coming soon.
Advanced customization
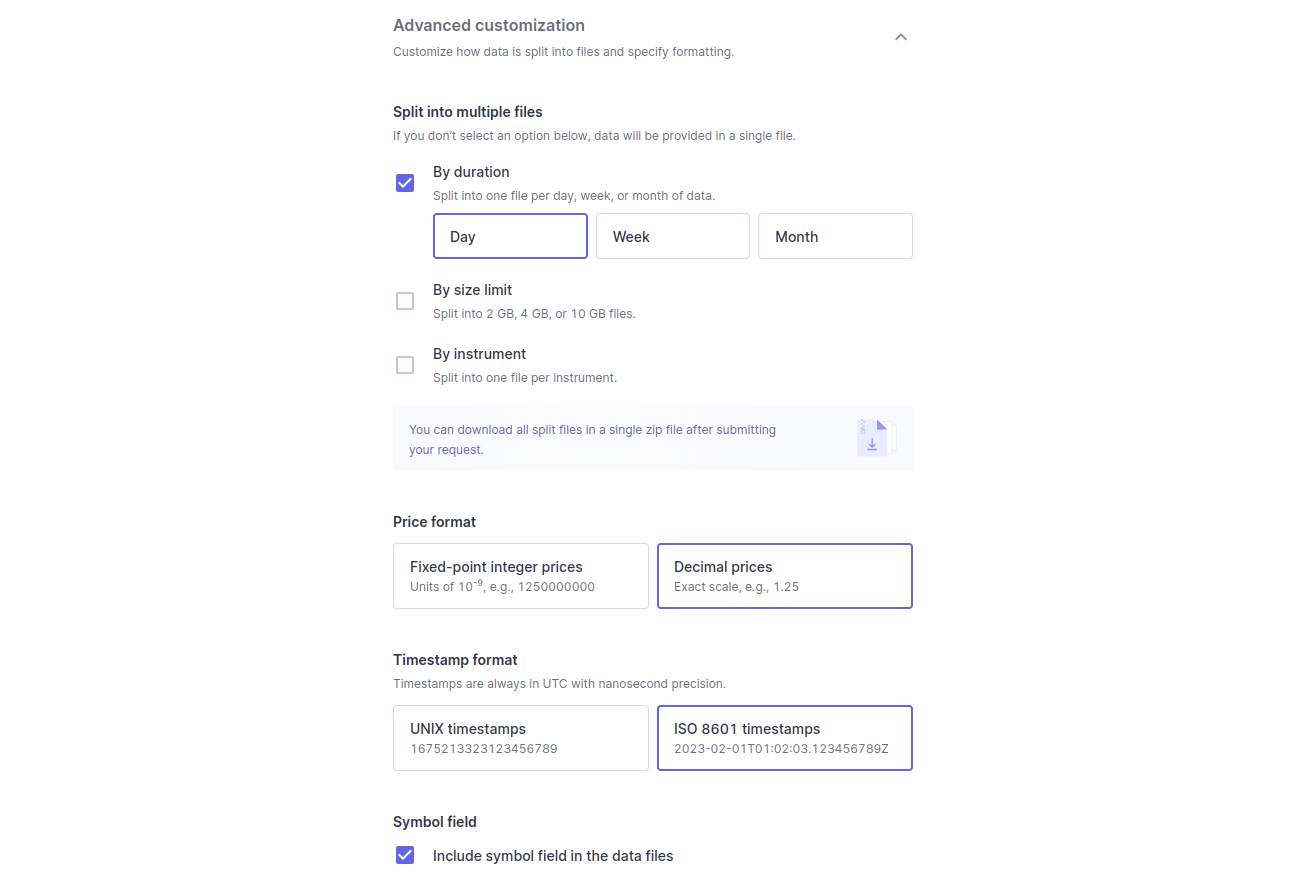
Split your data into different files based on the following:
- Duration. Split data into one file per day, week, or month.
- Size limit. Split files above a size limit of 2, 4, or 10GB.
- Instrument. Split files by instrument.
The following are additional customizations available for CSV and JSON encodings:
- Price format. Scale prices to decimal strings.
- Timestamp format. Format timestamps as ISO 8601 strings.
- Symbol field. Add a symbol field to the data.
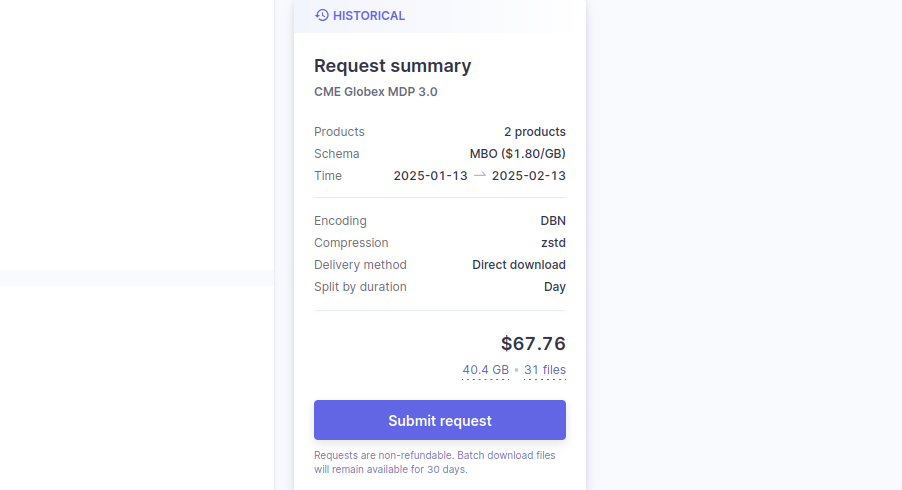
After you've customized your download request details, submit the request by clicking the Submit request button on the right side of the page.
We will queue and process your request, and the files will be ready for use on your Databento portal's Download center page. You can read more about accessing and managing downloads in our Download center documentation.
Data usage
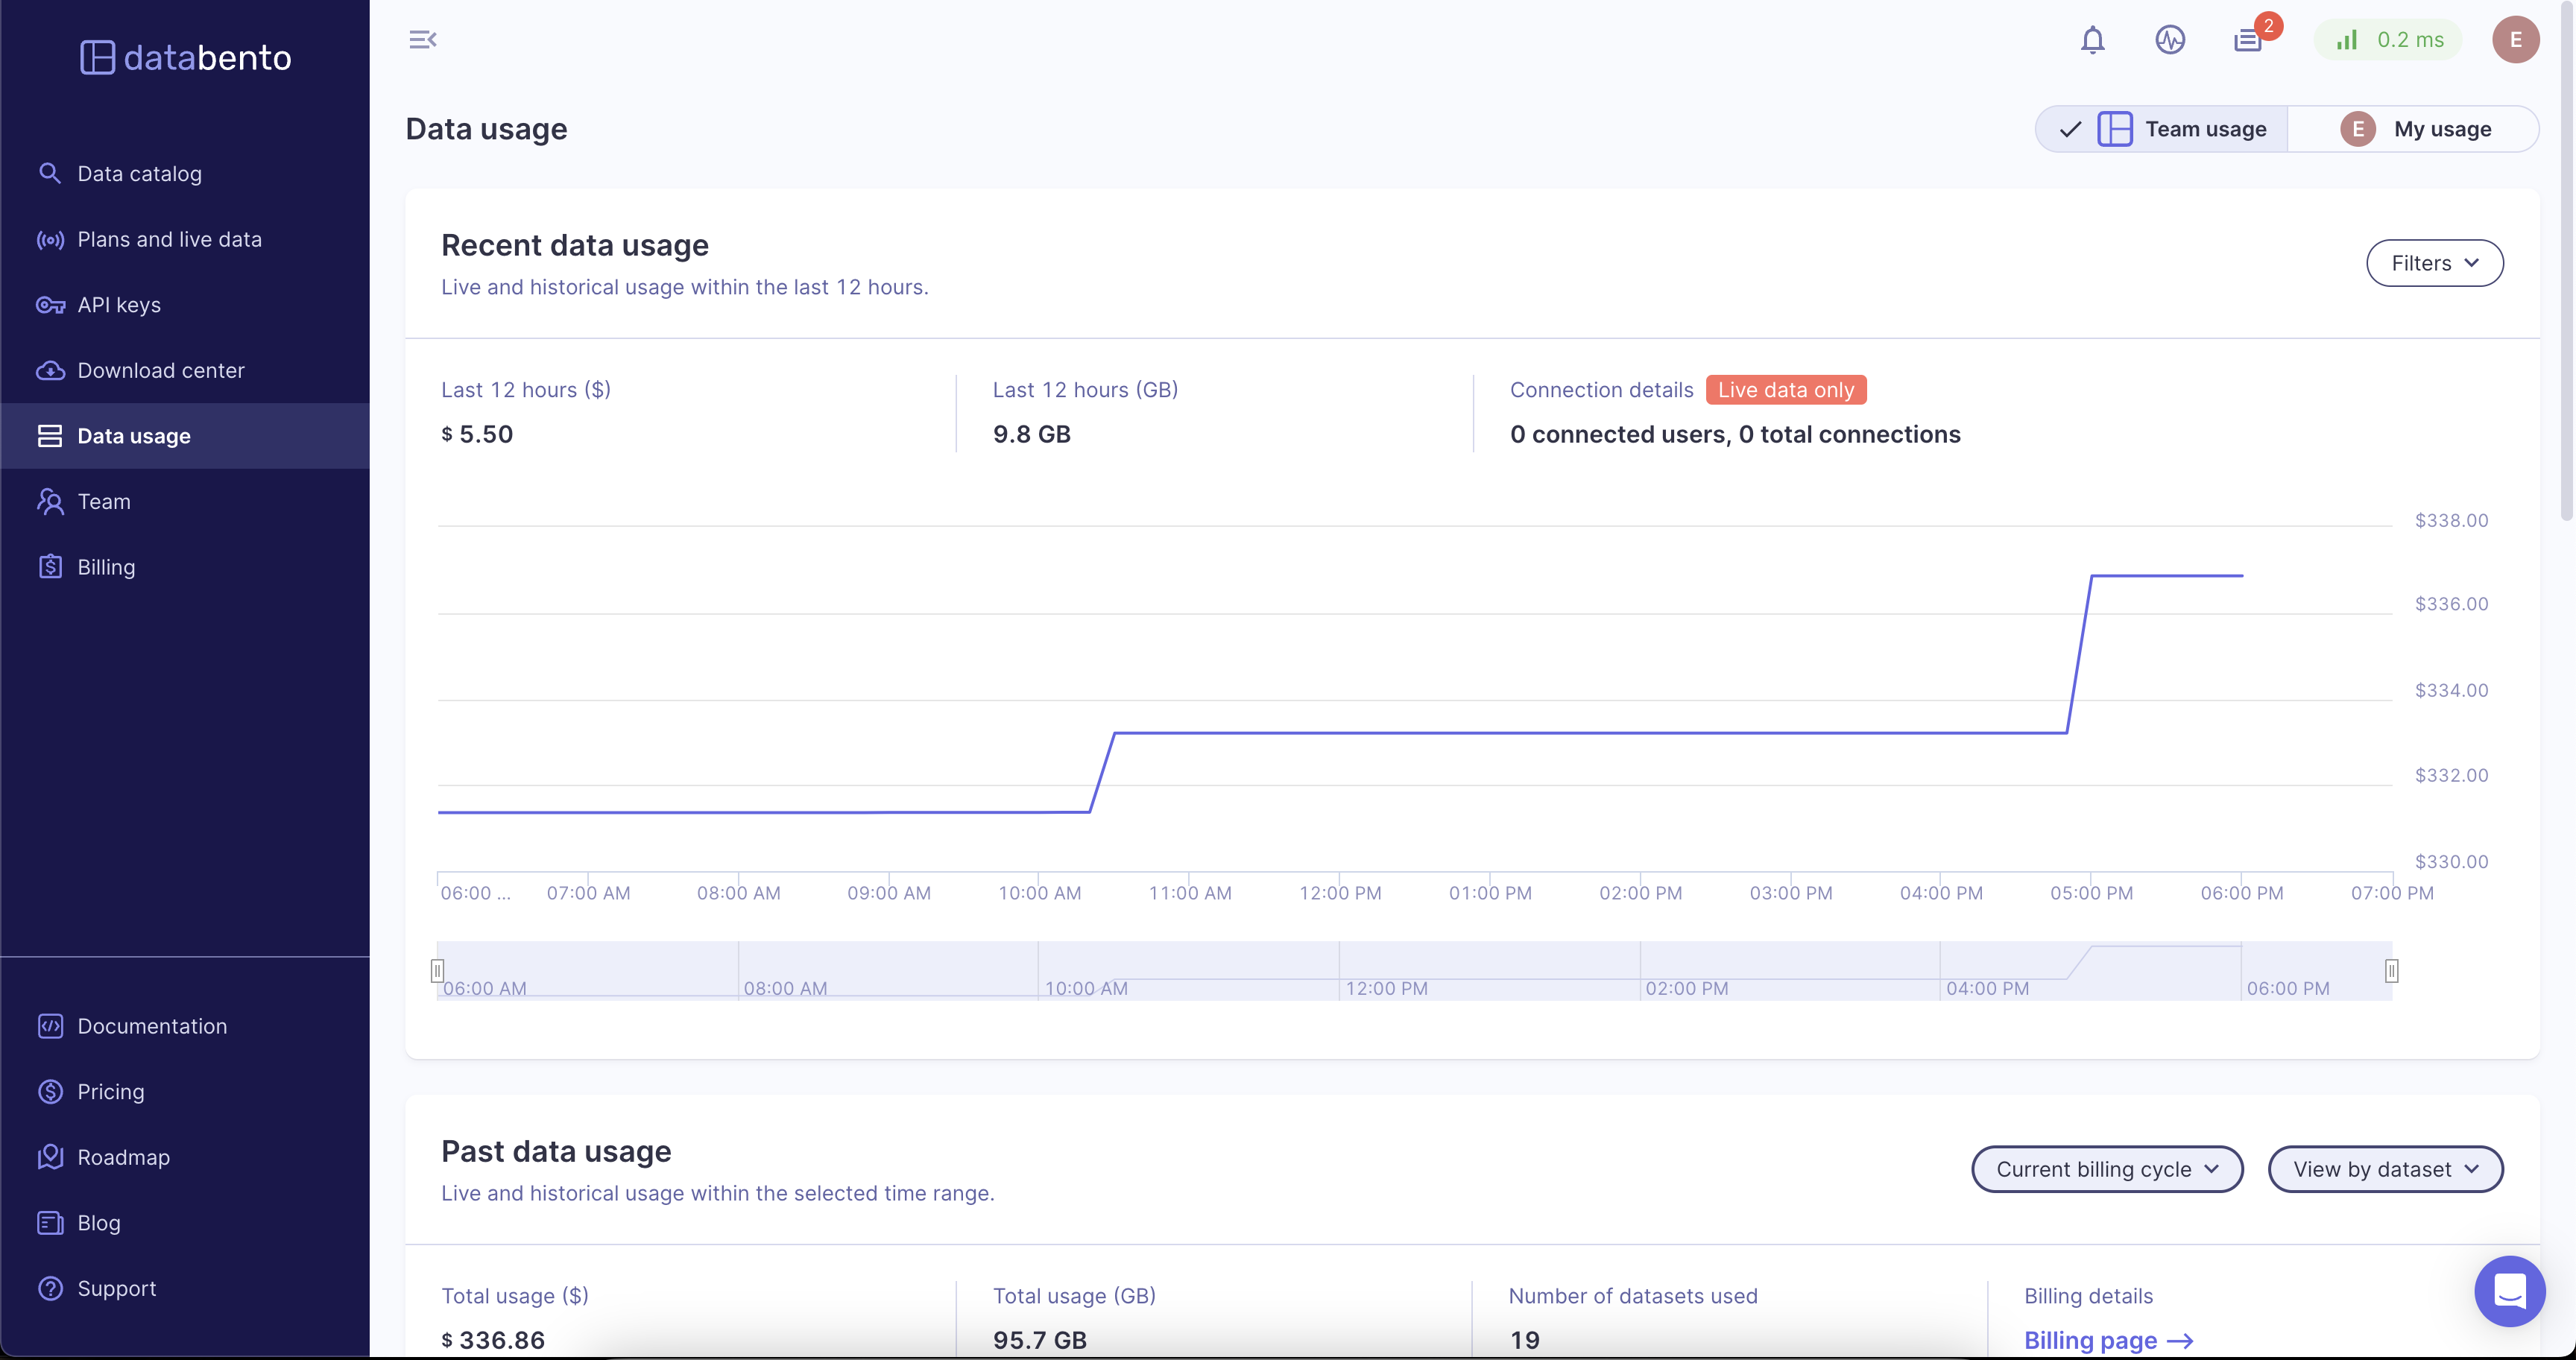
Overview
The data usage page allows users to monitor their most recent and historical data usage. Additionally, Owners and Admins can monitor data usage for members of their team.
Recent data usage
This section shows data usage for the most recent 12 hours. The following metrics are shown:
- Cost. The total cost in dollars.
- Gigabytes. The total amount of data used in gigabytes.
- API keys. The number of API keys currently in use with open connections.
- Connections. The total number of open connections.
You can filter these metrics based on the following:
- Dataset. Filter by dataset.
- API Key. Filter by the API key.
- Mode. Filter by mode. Options are Historical Streaming, Historical Batch, and Live.
- Historical Streaming. Streaming requests made through the Historical.timeseries endpoint.
- Historical Batch. Batch download requests made through either the Historical.batch endpoint, or the online portal.
- Live. Real-time data streamed from the Live API.
Past data usage

This section shows live and historical data usage for a selected time range. You can view data usage based on the following:
- Date range. The specific date range to filter on.
- Dataset. View data usage by dataset.
- API Key. View data usage by API Key.
You can sort these results by the following:
- Cost (%). The cost as a percentage of the total.
- Cost ($). The total cost in dollars.
- Size (GB). The total size of the data in gigabytes.
See alsoIf viewing this data by dataset, you can use the carrot next to the dataset name to view data usage by mode and schema.

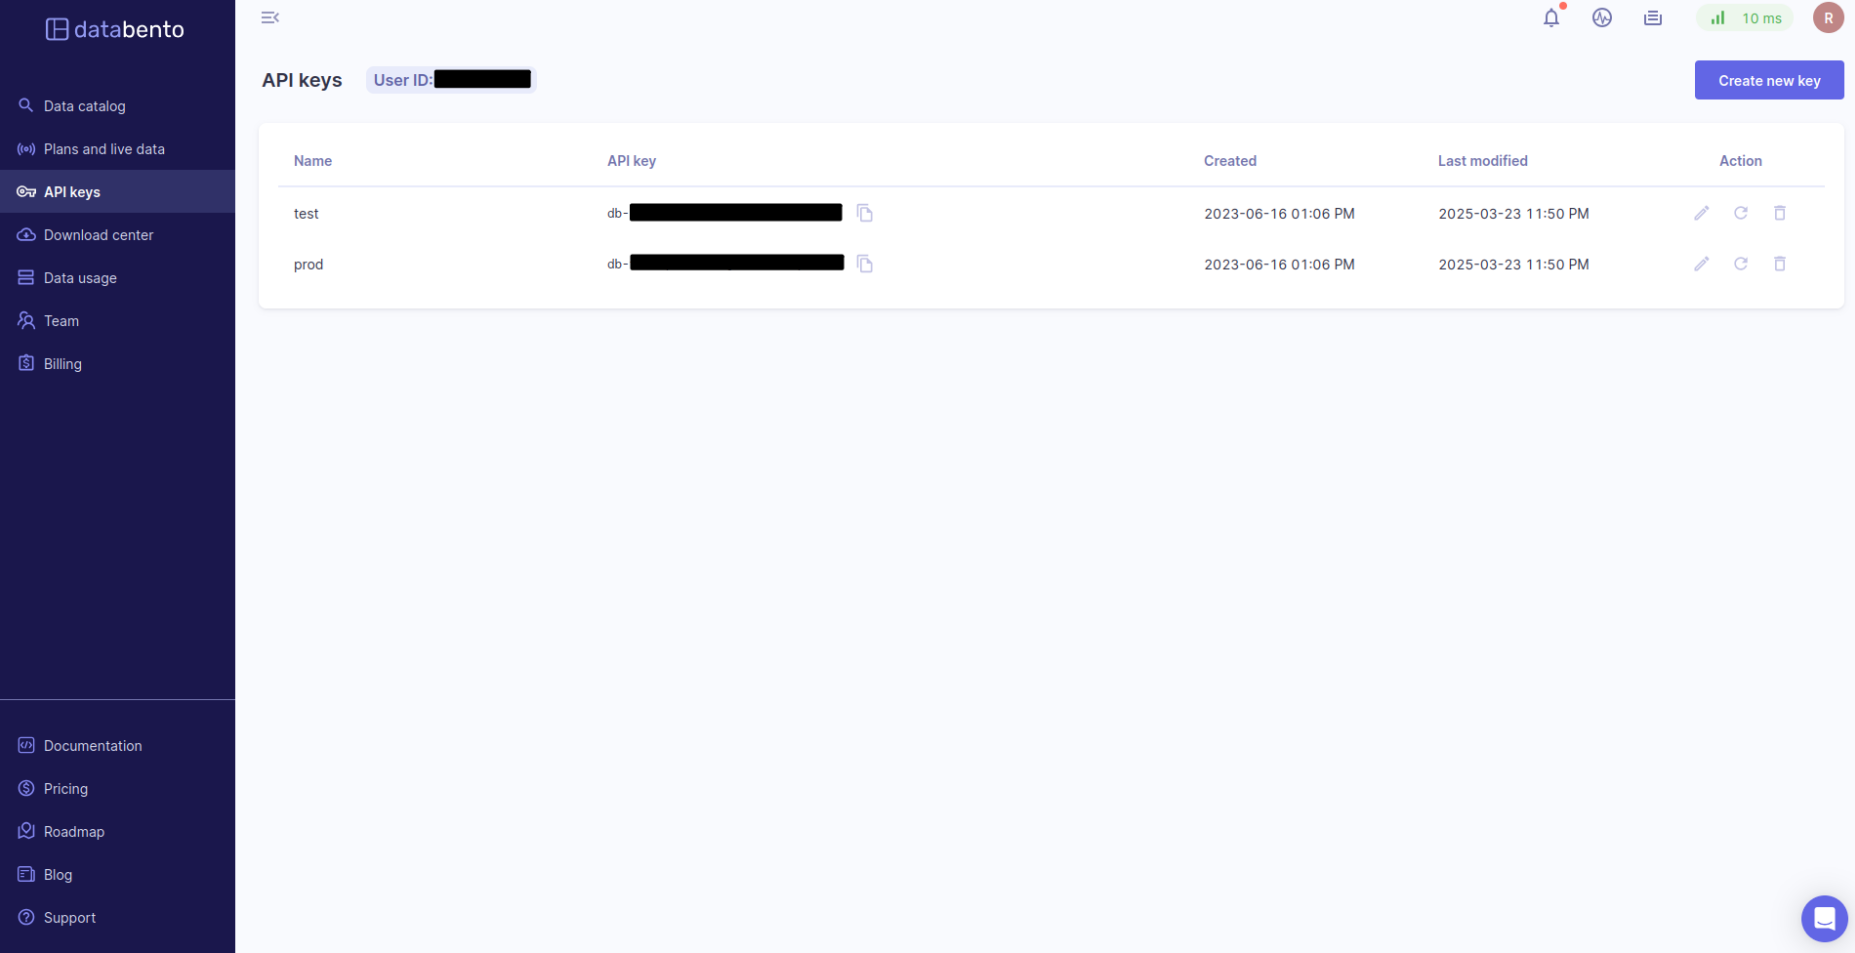
API keys
Overview
An API key is an authentication key generated by our API to identify the source making a request to the Databento platform.
API keys add a layer of security to your account. With them, you can authenticate data requests without using your account username or password. You can also assign specific permissions to team members and limit data access. Protect your API key like your password—never give it to a third party.
There is a limit of 100 API Keys on your account. If the maximum number of keys is reached, a 403
error status will be returned when attempting to create a new key.
Creating an API key
- Click the Create a new key button.
- Provide a descriptive name for your API key (API key names must be unique, and up to 64 characters long).
- Click on the Create button.
Editing an API key
- Click on the pencil icon for the key you want to edit.
- Type a new name for the API key.
- Click on the Save button.
Rotating an API key
We recommend that you regularly rotate all API keys for security reasons. This limits the time any one key is active, reducing potential billing impact if a key becomes compromised. See the end of this guide for other best practices to secure your API keys.
- Click on the rotate icon for the key you want to rotate.
- Click on the Rotate button to confirm.
Note: Any live applications currently using the API key will be disconnected.
Deleting an API key
- Click on the trash can icon for the key you want to delete.
- Click on the Delete button to confirm.
Note: Before you delete a key, we recommend you first test that it's no longer in use.
Copying an API key
- Click on the copy icon for the key you want to copy. The API key has now been copied to your clipboard.
Securing your API keys
Since API keys are used to authenticate requests, it's important to secure them. If your API key is exposed and used to access data, your account will incur billing charges. Aside from regularly changing your API keys, here are some best practices to keep them secure:
- Don't store your API keys within source code under version control. Instead, we recommend setting your API keys as environment variables. If you need to store an API key in a file, it's advised to store it in an
.envfile that's read at runtime. - Regenerate any API key that may have been compromised. If you have reason to believe that an API key has been compromised, delete it immediately. You can create a new one in your Databento portal.
- Use a different API key for each application. This allows you to isolate incidents and regenerate the key for one application without affecting others.
- Turn on historical usage limits. Users with a compromised API key are liable for any unauthorized charges. For additional protection against misuse, you can set up usage limits in your Databento portal. These limits can't be adjusted via API.
Revoked API key
Your account security is important to us. If we find that an API key has been made public, whether on GitHub, in our Slack community, or elsewhere, we'll revoke the key to protect your account. A revoked API key can't be used for authentication, so to remedy this, rotate the revoked key or create a new key.
Download center
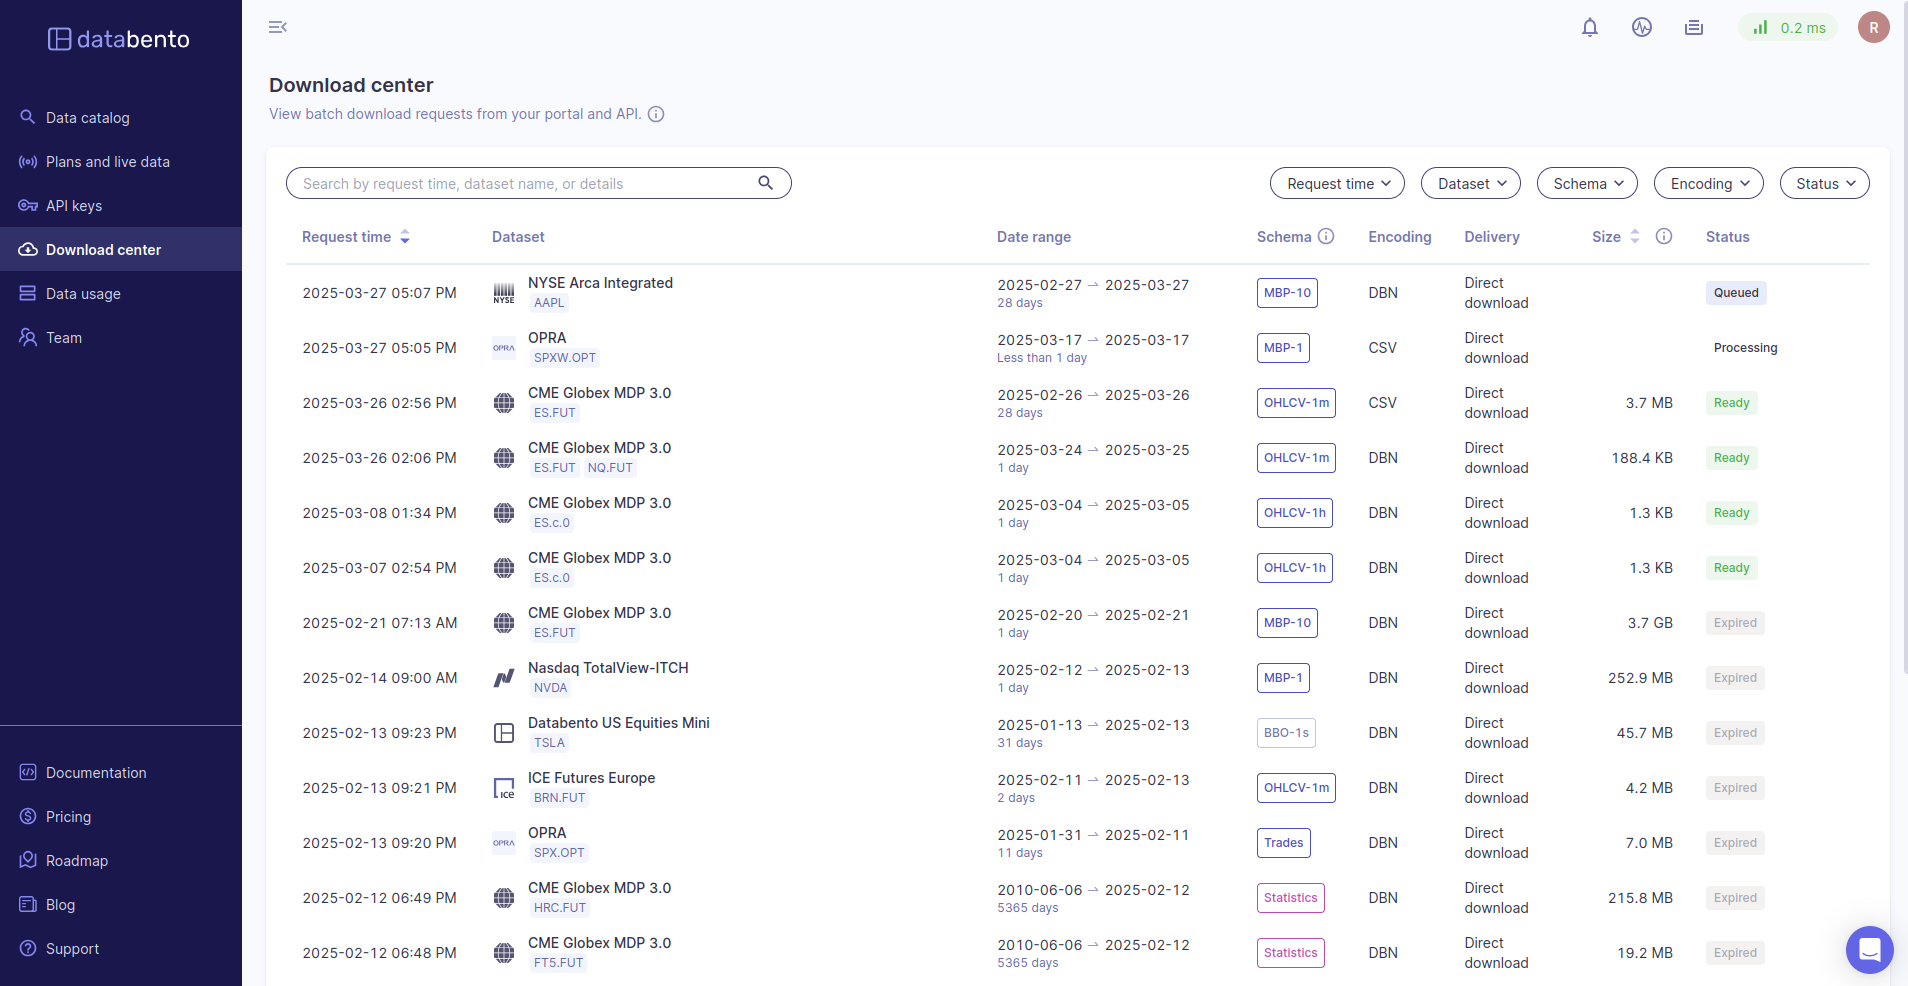
Overview
You can access and manage all data downloads on the Download center page of your Databento portal. After you submit a download request, we prepare the flat files on the backend and then save them to the Download center.
Finding previous downloads
You can search for downloads in the Download center search bar. You can search by the following:
- Request timestamp. Search for a specific date range.
- Dataset. Search by dataset.
- Schema. Search by schema.
- Encoding. Search by encoding (DBN, CSV, JSON).
You can filter your search results with the following:
- Request timestamp. Filter by a specific date range.
- Dataset. Filter by dataset.
- Schema. Filter by schema.
- Encoding. Filter by encoding (DBN, CSV, JSON).
- Status. Downloads have statuses of either Queued, Processing, Ready, or Expired.
You can also sort by request time and billed size.
Interpreting download statuses
Downloads have the following statuses:
- Queued. We process download requests one by one. When a request has been Queued, it's been placed at the end of the "line" and will be processed.
- Processing. The request is at the front of the "line." We are actively preparing the files on the backend.
- Ready. The request is now a file that's ready for your use.
- Expired. The file has expired and can no longer be downloaded. You need to submit a new download request to access the data. Files expire 30 days after a download request has been submitted.
Download details
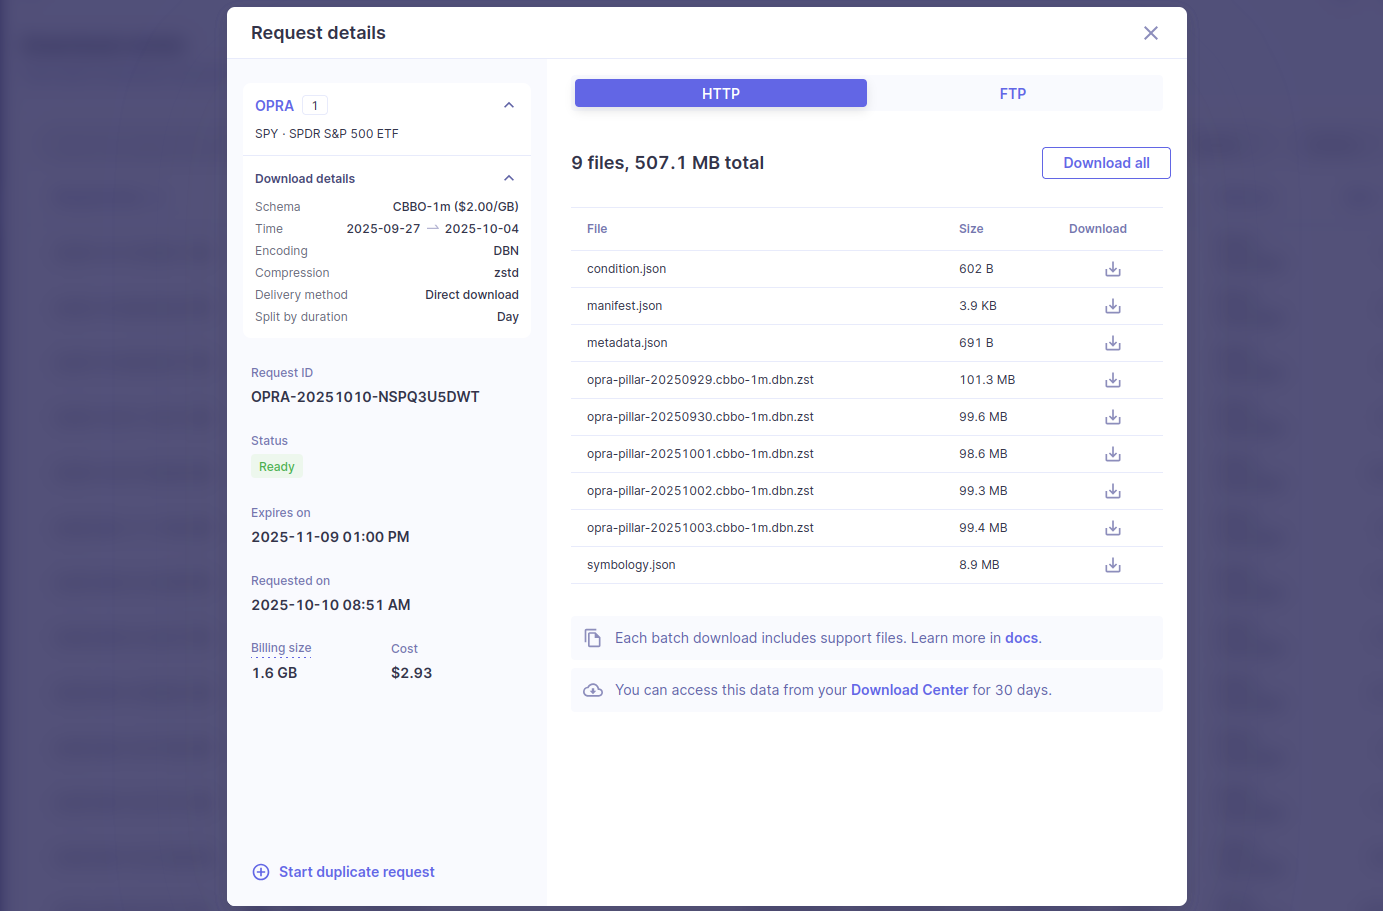
See alsoData can be downloaded from the API with batch.download.
Clicking on a download will open up the details of the request. This page will show various details about the download request, which includes the symbols, time range, and customizations selected.
Each file can be downloaded one at a time by clicking on the download icon next to each file. Additionally, all files can be downloaded at once in a zip file by clicking on "Download all".
Support files
Each completed batch job package includes the following three supporting JSON files:
condition.jsonmanifest.jsonmetadata.jsoncondition.json: This file outlines the dataset condition per date and aids in identifying the appropriate data for processing, including any missing or pending days. The same information can be obtained from metadata.get_dataset_condition endpoint.
manifest.json: This file lists all the batched data and support files contained in the package, including file names, sizes, and SHA-256 hashes. You can use this information to confirm that your data is complete and free of tampering or corruption. The same information can be obtained from batch.list_files endpoint.
metadata.json: This file describes the original request for the batch download, including any advanced customization options. The same information can be obtained from the batch.list_jobs endpoint.
If the requested data does not contain symbology information, one or more symbology support
files will be included. Each data file will come with an associated symbology file. This
file will be named similarly to the data file, except it will end with *.symbology.json.
This file is only provided when symbol mapping was not requested when using the CSV or
JSON encodings. Additionally, for CSV encodings an alternative CSV representation of this file is
provided for convenience.
These symbology support files provides symbology mappings for the batched data.
This allows you to interpret the integer instrument IDs and map these to their corresponding
raw symbols across date intervals. The same information can be obtained from
the symbology.resolve endpoint.
FTP
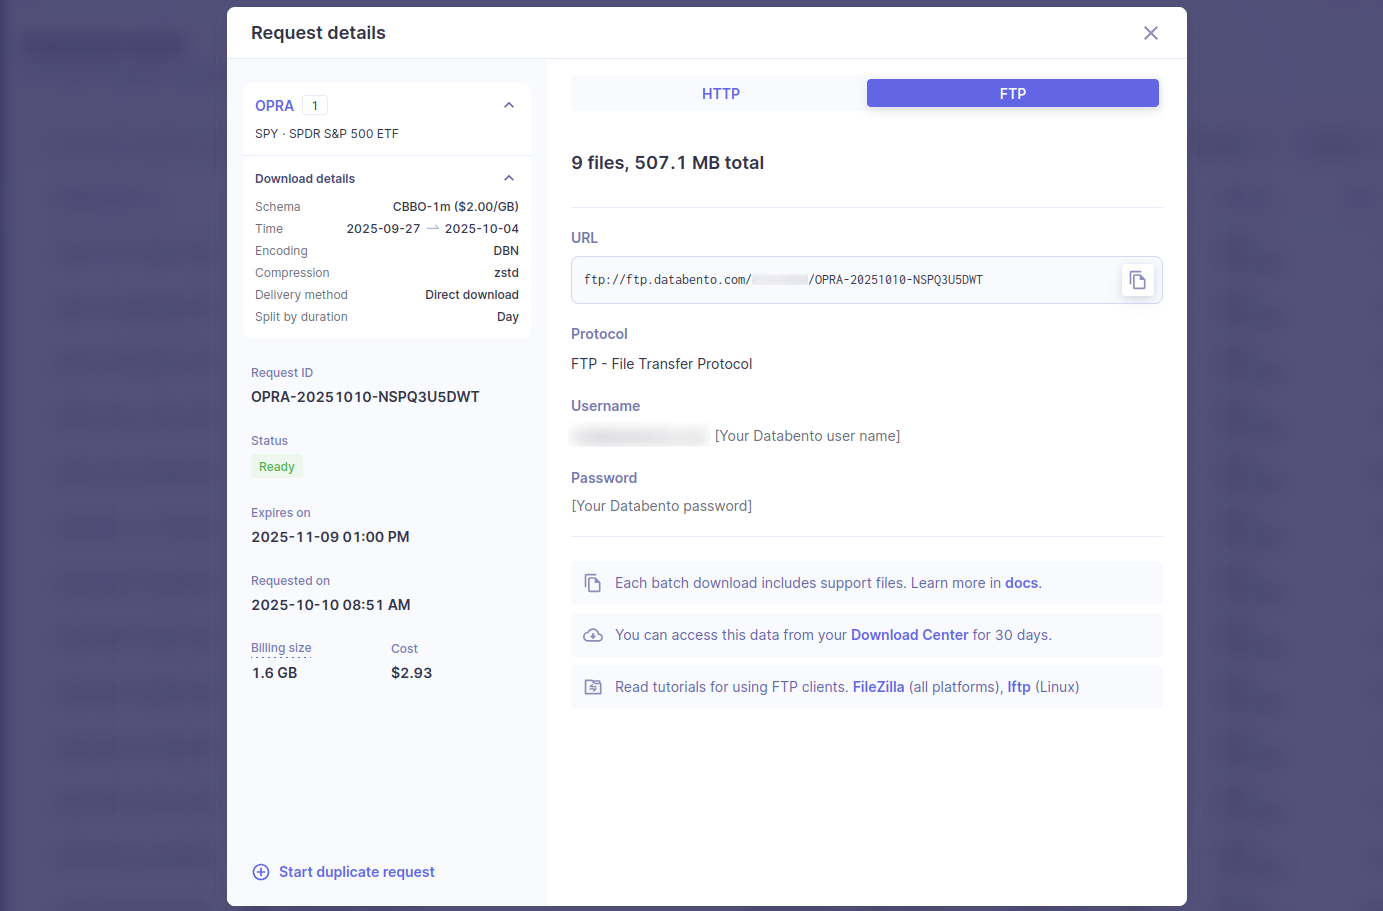
Databento also supports downloading data with FTP. FTP is ideal for downloading large datasets reliably, with the ability to browse directories and download multiple files at once. It's well suited for downloading recurring batch requests. Various FTP clients such as FileZilla and lftp can be used to download data.
Team
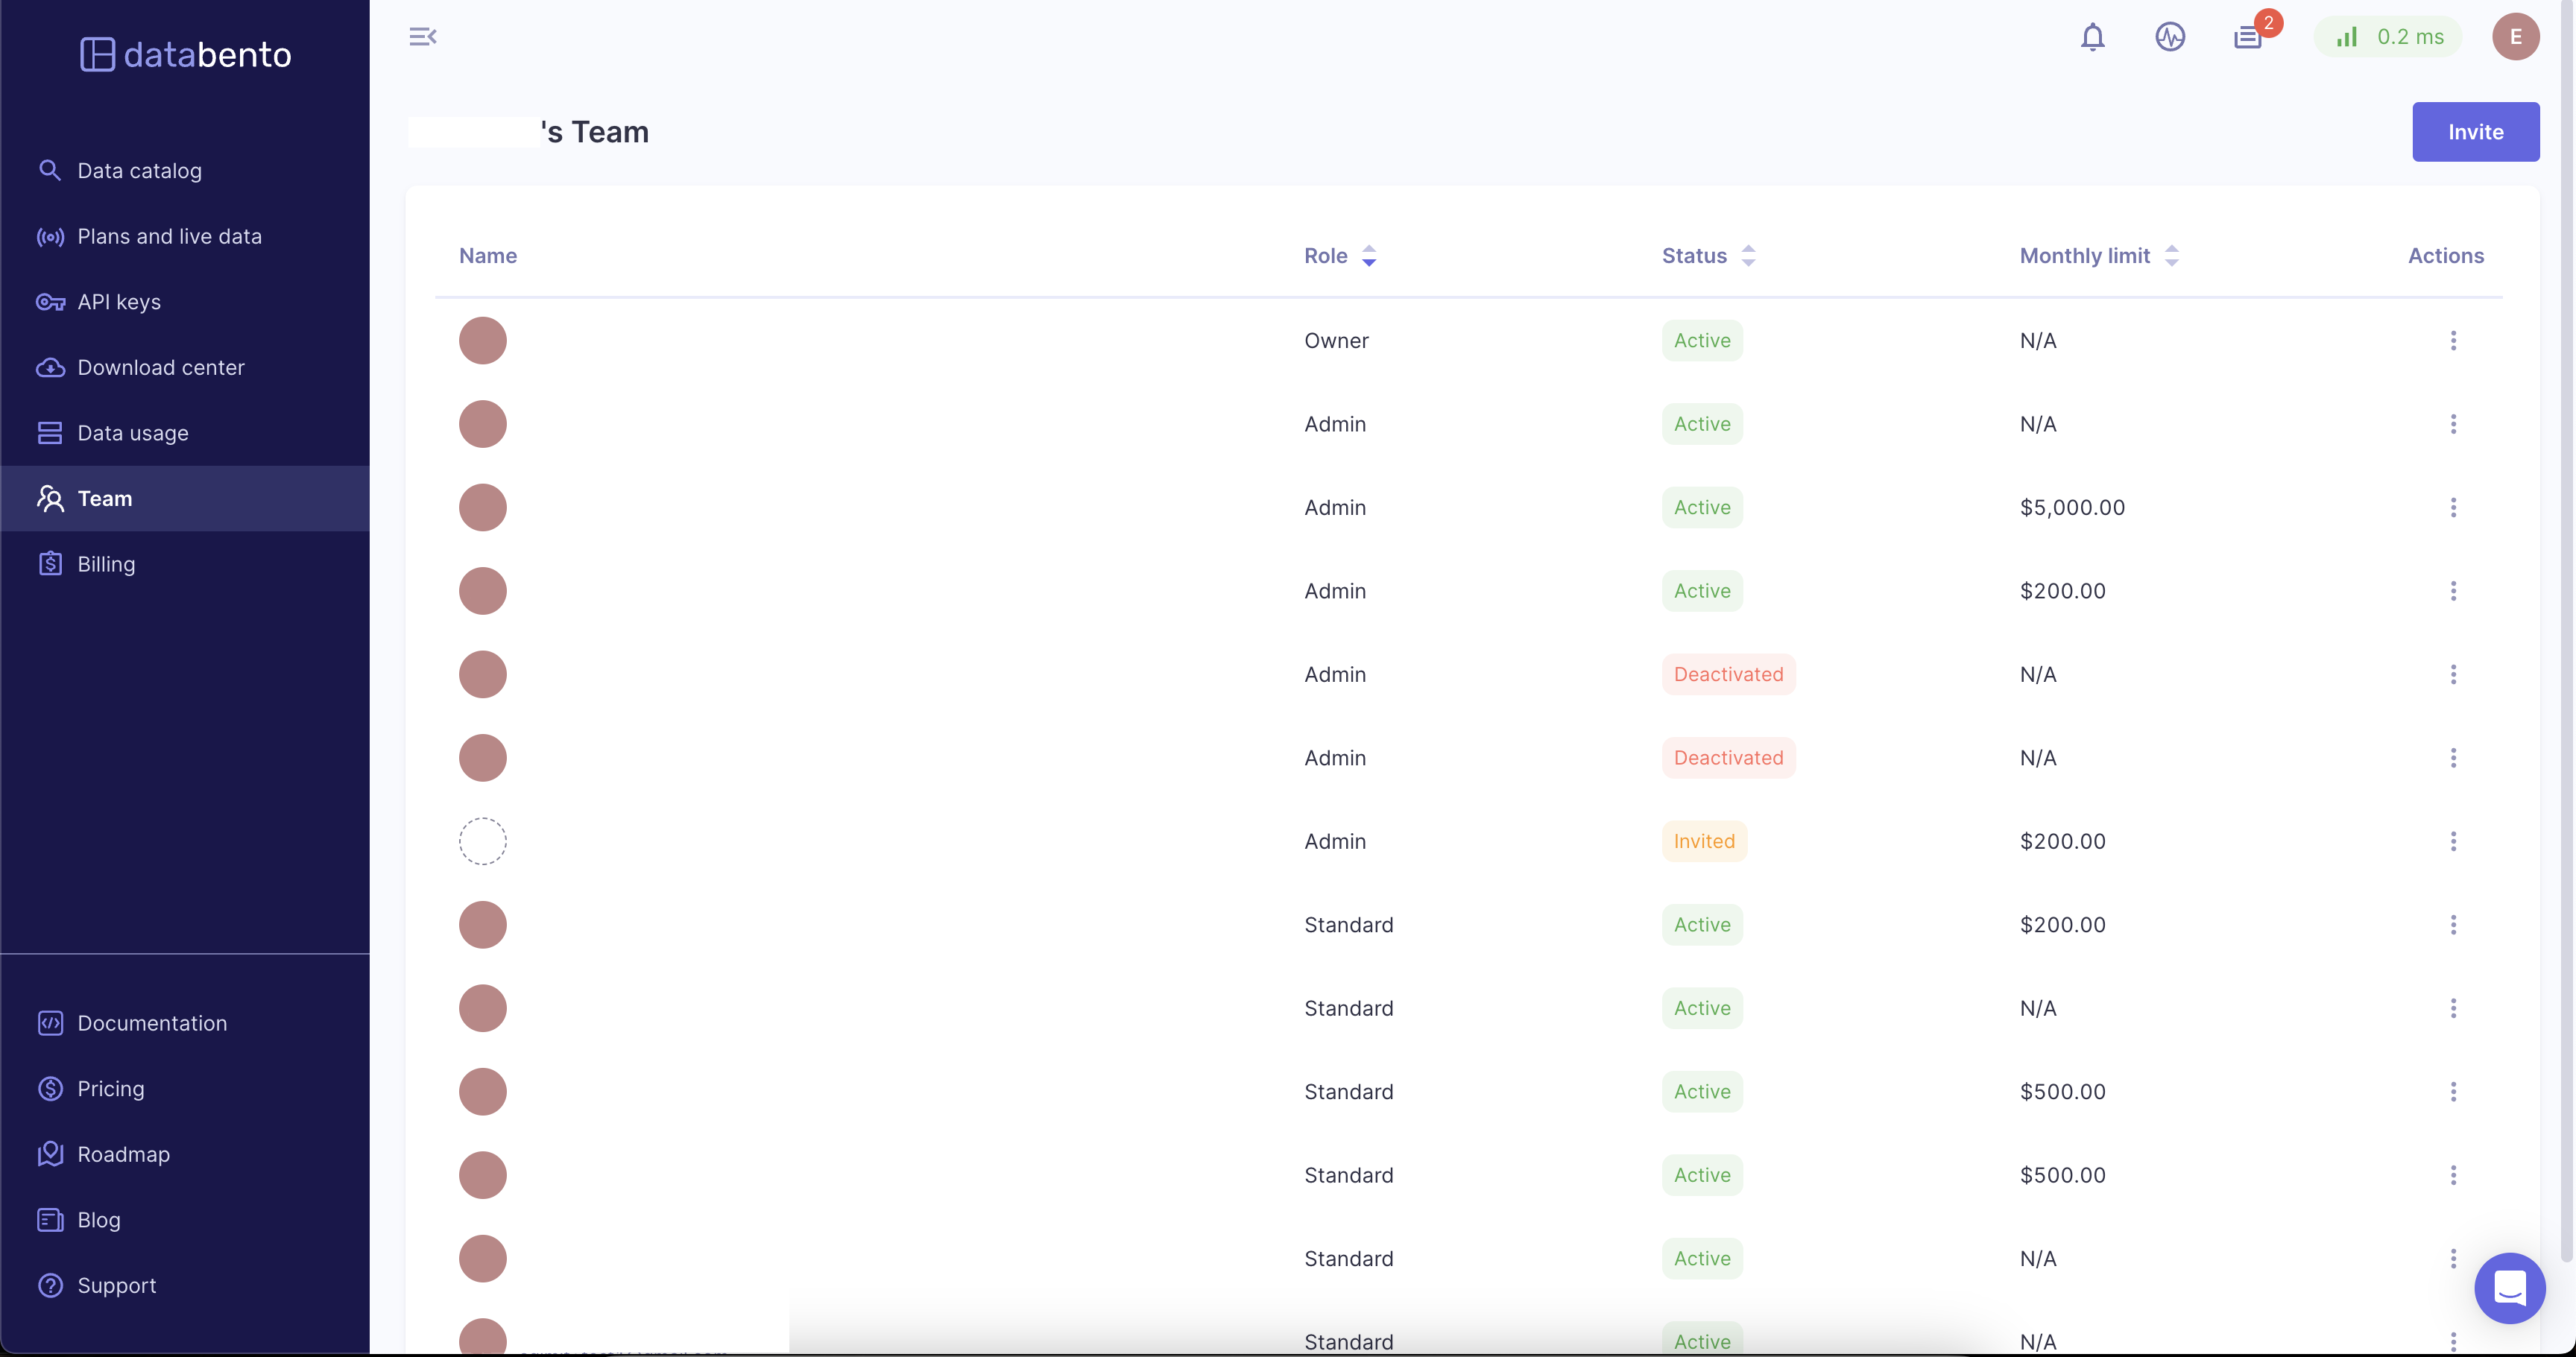
Overview
The following roles are available for team members:
- Owner. Ability to manage the team, billing, and data usage.
- Admin. Have the same administrative access as the Owner, but can't transfer team ownership or delete the team.
- Accounting. View-only access to billing and licensing information.
- Standard. Data users that don't have any administrative access.
A team member can have the following statuses:
- Active. An active member of the team.
- Invited. This user has a pending invitation to the team.
- Deactivated. This member has had their role revoked on the team.
- Note. A deactivated member can have their access restored by the Owner or an Admin.
When you create a Databento account without a team invitation, you are the team Owner.
See alsoThere is only one Owner per team, but you can transfer ownership to a different team member.
Member permissions summary
| Permissions | Owner | Admin | Accounting | Standard |
|---|---|---|---|---|
| Transfer team ownership | ✓ | |||
| Delete team | ✓ | |||
| View team member lists | ✓ | ✓ | ✓ | ✓ |
| Send and cancel invites | ✓ | ✓ | ||
| Update and edit members | ✓ | ✓ | ||
| Delete and deactivate members | ✓ | ✓ | ||
| View invoices | ✓ | ✓ | ✓ | |
| Download invoices | ✓ | ✓ | ✓ | |
| View licensing documents | ✓ | ✓ | ✓ | |
| View personal monthly spend | ✓ | ✓ | ✓ | ✓ |
| Set team historical monthly limit | ✓ | ✓ | ||
| Make payments | ✓ | ✓ | ||
| Update payment method | ✓ | ✓ | ||
| Monitor members' data usage | ✓ | ✓ | ||
| Manage data licenses | ✓ | ✓ | ||
| Use data | ✓ | ✓ | ✓ | ✓ |
Invite a team member
InfoOnly the Owner and Admins can invite a member to the team.
- Click on the Invite button.
- In the Email field, enter the email address of the team member you want to invite (this email cannot be associated with an already existing Databento account).
- Choose the team member's role.
- Additionally, you can set a monthly limit for this user and a message with the invitation.
- Click the Send button. The invited member will receive an email notification.
Before an invited member accepts the invitation, their account status is shown as Invited.
Deactivate a team member
InfoOnly the Owner and Admins can deactivate a team member.
A deactivated member cannot log into their account, and their existing integrations are removed. They stay on the team list, but they're shown as deactivated.
- Click on the overflow menu for the selected team member, and select the option to deactivate.
- Confirm the deactivation in the confirmation dialogue.
To reactivate a member, go to the team list and select the member you want to reactivate. Upon reactivation, their account is fully restored, and they can sign in with their original credentials.
Delete a team member
InfoOnly the Owner and Admins can delete a team member.
Deletion permanently removes a member from the team and deletes their account. The member is removed from the team list, and their existing integrations are removed.
- Click on the overflow menu for the selected team member, and select the option to delete.
- Confirm the deletion in the confirmation dialogue.
A deleted member can't be reactivated. They can only be added back to the team as a new member.
Transfer ownership
InfoOnly the current Owner can transfer the Owner role to a different member
- Click on the overflow menu for the team member you want to make the new Owner, and select the edit option.
- From the Role dropdown, select the Owner role.
- Confirm the transfer in the confirmation dialogue.
Upon transfer of the Owner role, the previous Owner's role will change to Admin.
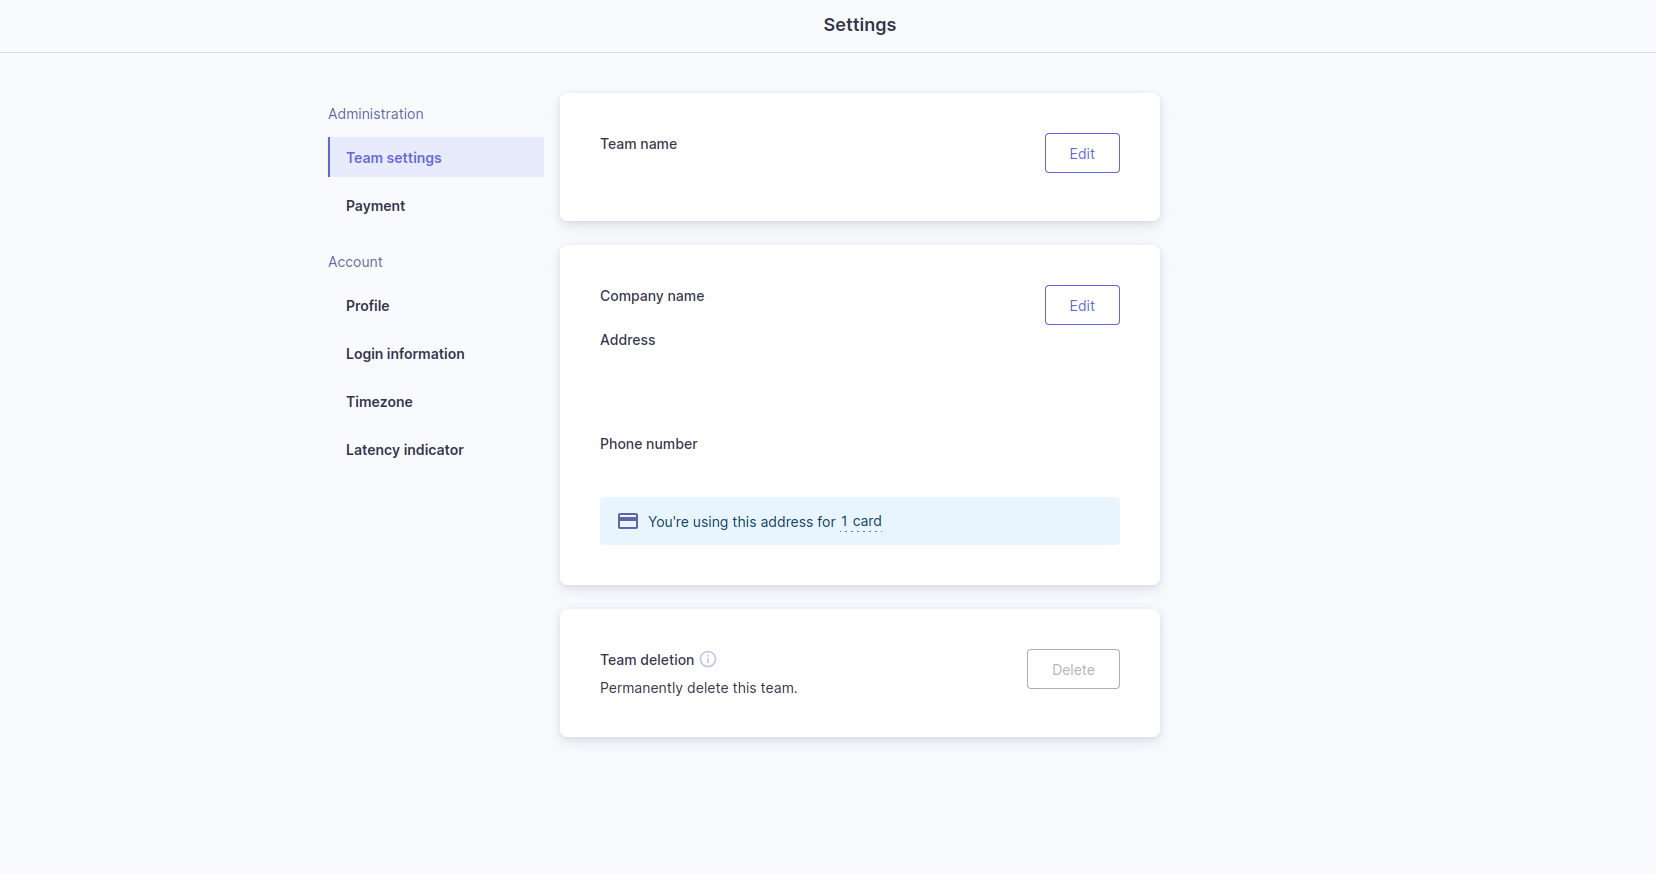
Delete a team
InfoOnly the current Owner can delete a team.
To enable team deletion, you must first cancel all data licenses and pay any outstanding balances. After these steps are complete, navigate to your Settings page by clicking on your avatar in the upper right-hand corner.
- Under Team deletion, click the Delete button.
- You will be prompted to confirm the deletion by entering your password.
- After deletion, all team members will immediately be signed out and lose both portal and API access.
WarningTeam deletion is permanent, and you won’t be able to recover your team.

Billing
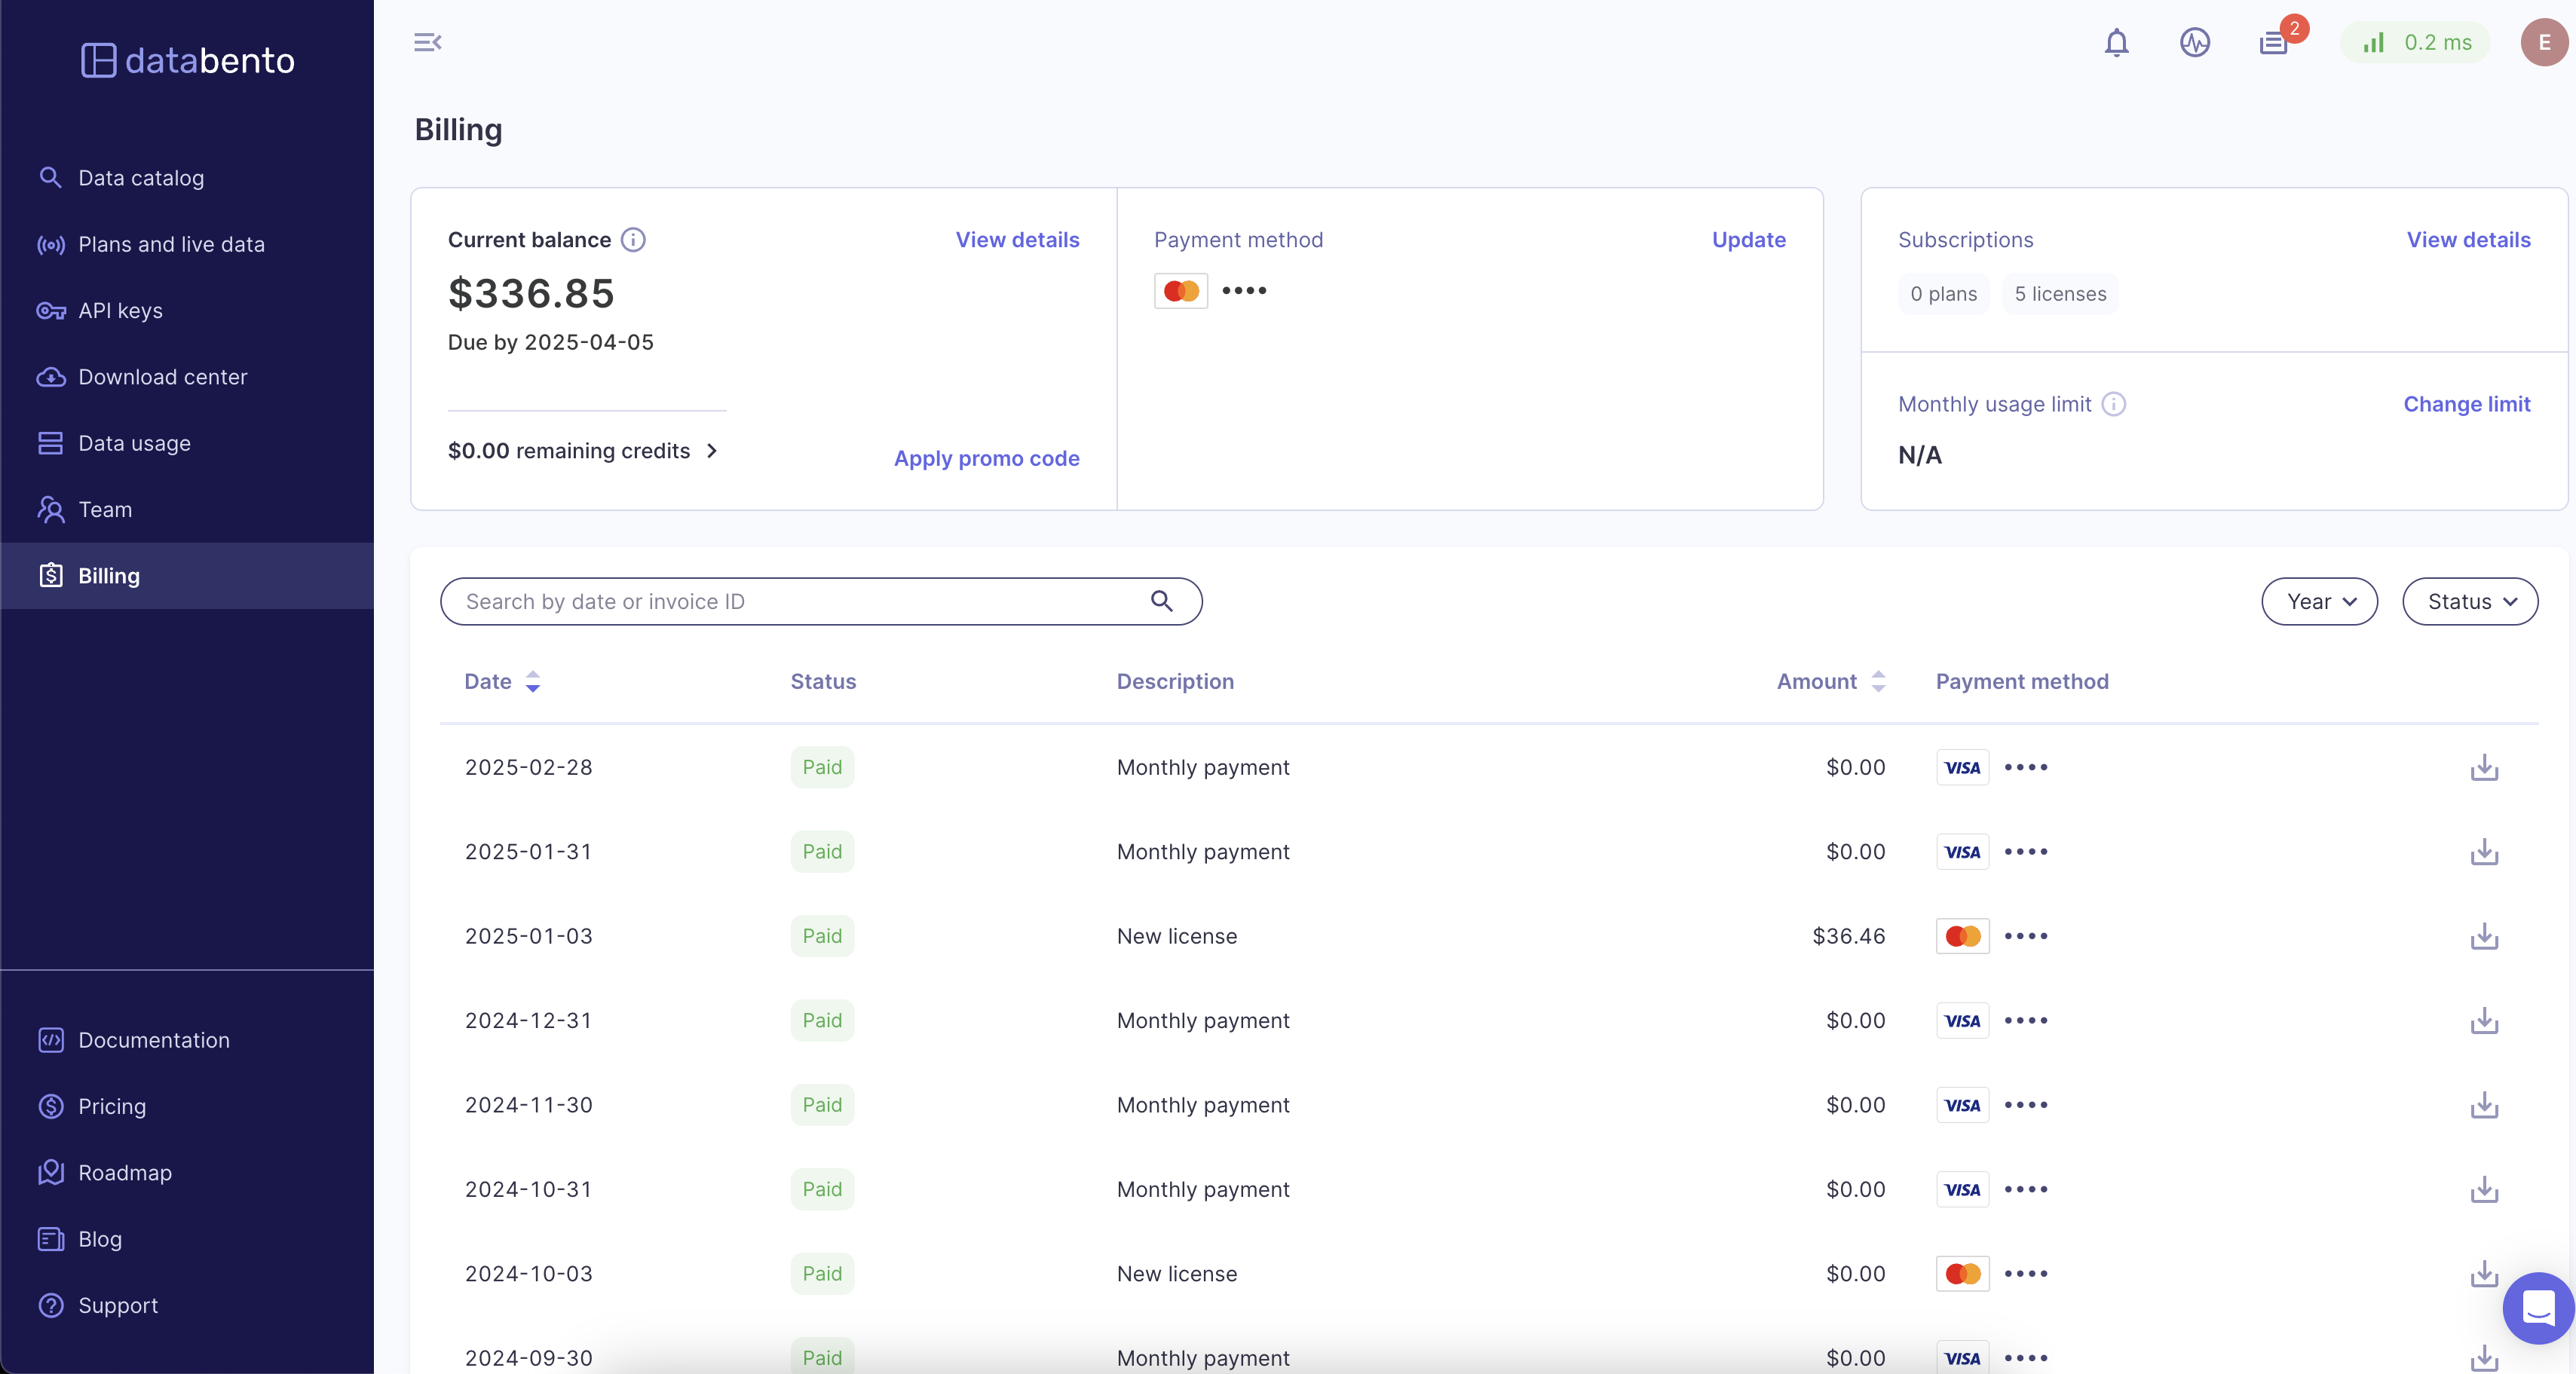
Overview
Owners and Admins have edit access to all billing features, while Accounting members have view-only access. For more information on roles, see our Team management guide.
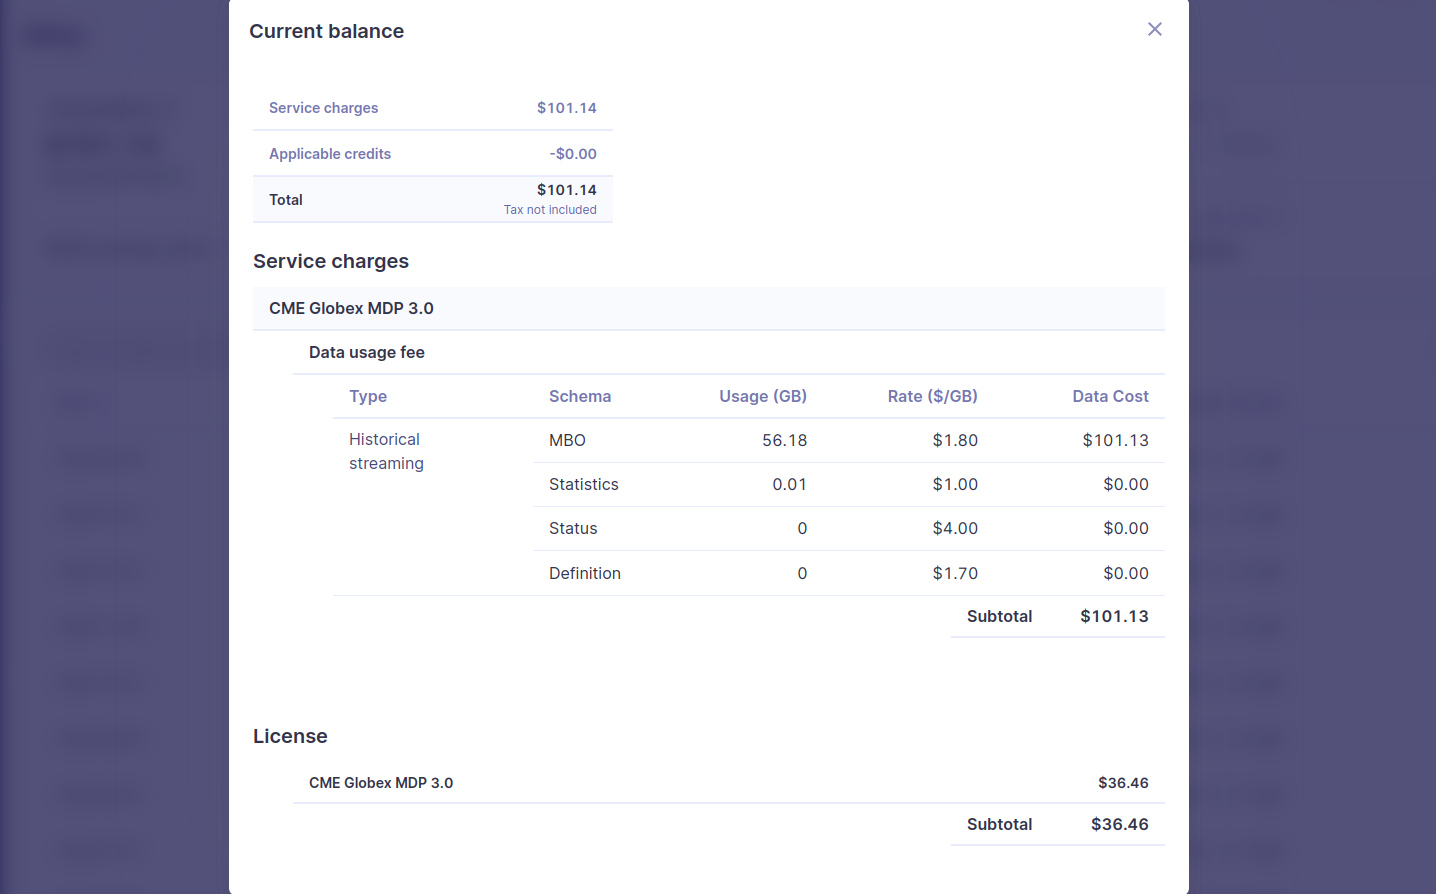
The current balance on your account, as well as any remaining credits, will be shown in the top left corner of the billing page.
InfoApplicable credits are automatically subtracted from the current balance.
Clicking the View Details button in this section will pull up a detailed description of your current balance.
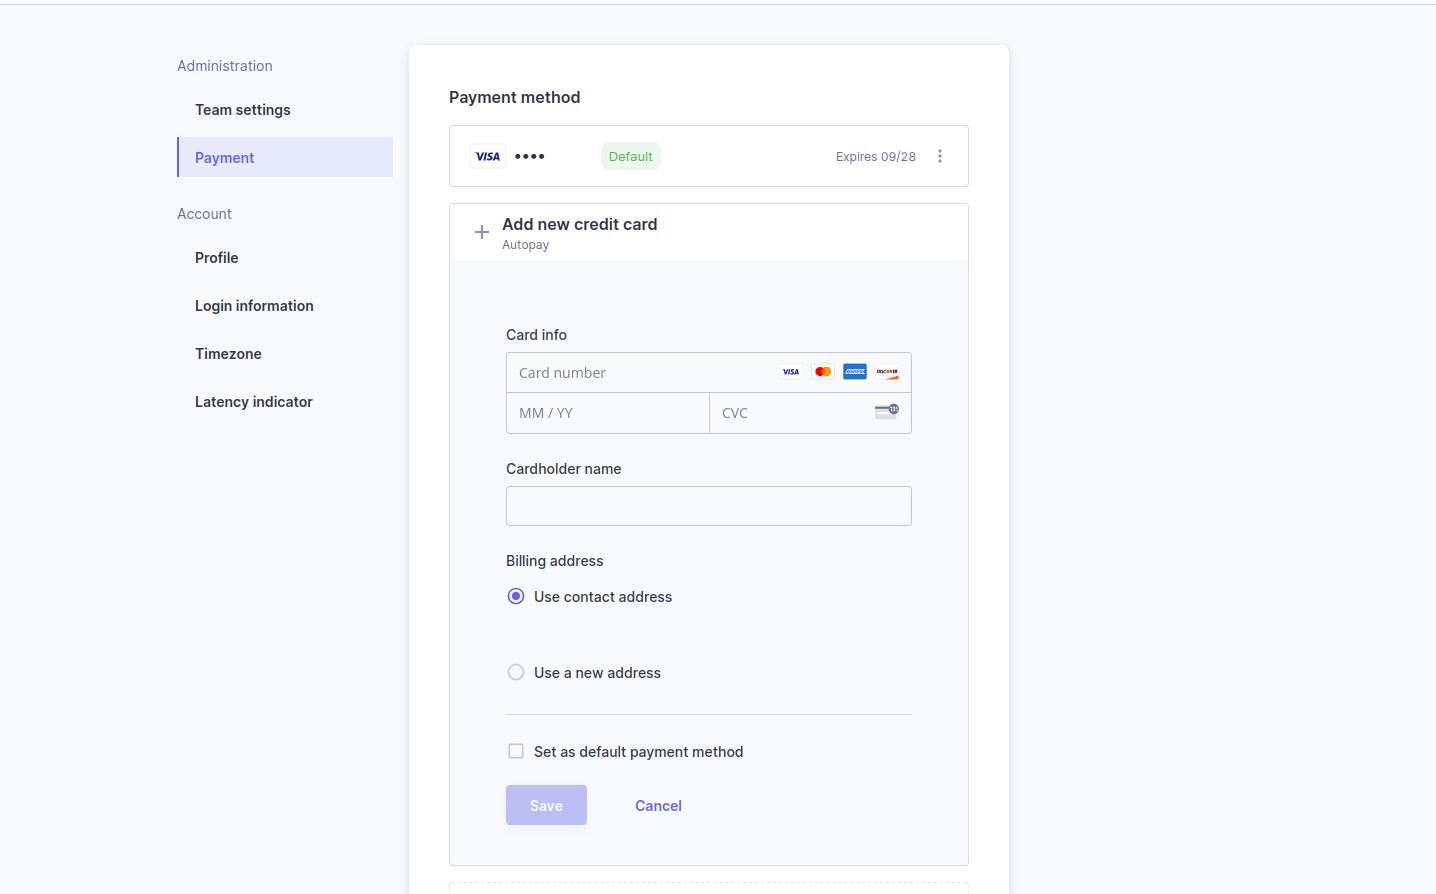
Update payment method
Payment method(s) can be updated after account creation.
- Click the Update button in the payment method section.
- You have the option to add, update, or delete credit cards.
- Additionally, you can set different cards as your default method.
InfoDatabento only supports ACH and wire transfer for members with a Plus or Unlimited plan.
Manage historical monthly limit
- Click the Manage button in the usage-based access section.
- Turn on the Enable pay as you go toggle.
- Turn on the Set a monthly limit toggle and enter the desired limit amount.
- To receive an email when you've approached a part of your limit, turn on the Receive email notifications toggle and set the desired limit.
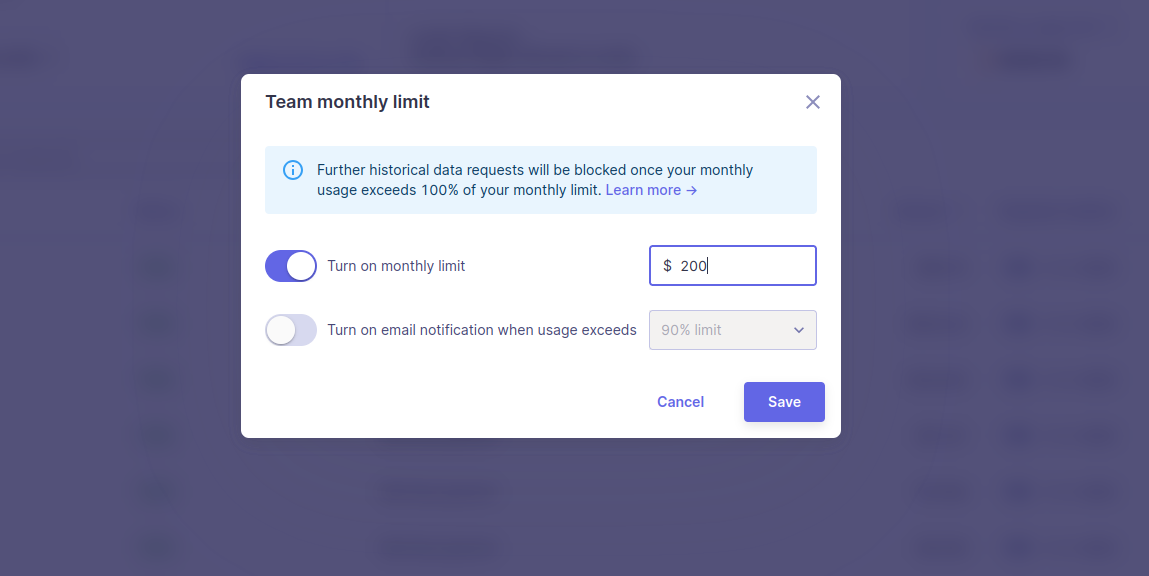
InfoDatabento will block further historical data requests once your monthly usage exceeds your limit. If you don't have a historical monthly limit set, your account will be set to Unlimited. Your data requests will never be blocked based on usage amount. Live data requests are not subject to this limit; this usage is always Unlimited.
Billing timeline
Each billing cycle starts on the first day of the month and ends on the last day of the month. Each invoice is available on the first day of the following month. Your invoice includes all download requests initiated until 23:59:59 UTC on the last day of the month.
InfoYour payment date is always 5 calendar days after the end of the month.
- The Date column of the Invoices table marks the last day of the billing cycle it
represents. The Date column doesn't represent the day the invoice is first available.
- Example. You open a Databento account on June 3. Your billing cycle ends on June 30, and your first invoice is available on July 1. All your download requests from June appear in your first invoice. Your first payment is due on July 5.
Invoice status
There are four possible invoice statuses:
- Upcoming payment. The invoice has been sent but not yet paid. An invoice status is
Upcoming payment between the last day of the month and the payment date.
- Depending on your activity, your invoice may be changed during this time.
- Example. You submitted a download request shortly before 23:59:59 UTC on the last day of the month. Data continues to be downloaded to your account, so your invoice is changed to reflect this.
- Depending on your activity, your invoice may be changed during this time.
- Paid. The invoice payment was successful.
- Past due. The invoice payment was unsuccessful.
- Canceled. Databento manually cancels the invoice charge.
- You can't do this directly in your portal, but you can reach out to our support team and request an invoice cancellation.
Failed or late payments
If your payment fails, we immediately email you a notification with details. Your account is on hold from requesting new data and downloading existing datasets. Your invoice is also marked as Past due. To resolve your payment issue and unblock data access, update your payment method.
Here's what to expect if we still can't process a payment:
- ≤ 5 business days after the payment date. We'll keep retrying your payment method automatically. If the payment is made successfully, your invoice will be marked as Paid.
- > 5 business days after the payment date. Your invoice will be marked as Past due. You'll need to work with our support team to manually resolve the late payment.
Here are common reasons why failed payments may happen:
- Insufficient funds. Make sure there are sufficient funds on your card, especially toward your monthly bill date.
- You reached your credit card limit. Some credit cards have limits for the maximum amount that can be charged in a single transaction. If you have a limit on your credit card, you can decrease your payment threshold to match this amount.
- Processing/verification issue. Most payments fail when your bank or payment provider experiences an issue processing your payment. Check the expiration date on your credit card to make sure it isn't expiring for your future charges.
- Incorrect bank account information: Make sure the bank account information (ex: account number, bank code, or bank name) in your Payment Settings is correct.
Reference dataset pricing
Databento offers three subscription plans for reference datasets:
- The Starter plan includes access to any 1,000 symbols.
- The Unlimited (US only) plan includes all 10,000+ US symbols.
- The Unlimited (US & Global) plan includes all 310,000+ US and global symbols.
InfoSymbol limits are based on the International Securities Identification Number (ISIN) - ISO 6166 system.
ISIN codes don't always correspond with the symbols used on exchanges.
If you don't need full coverage of US or global securities, the Starter plan provides access to a limited number of symbols (ISINs) on an annual basis. We keep track and count any new symbols when they're requested on our API. You won't have to decide on these symbols upfront. We reset this each time your subscription renews.
- Initial allocation. Up to 1,000 symbols.
- Allocation management.
- Each successful request that includes a new symbol will count towards the allocated symbol limit.
- API requests exceeding the allocated symbol limit will return an authorization error.
- Our support team can provide you with a list of symbols that you've consumed.
- Additional allocation. Additional symbols can be requested for $1 per month, but this will reset the contract term.
- Plan upgrades. You can upgrade from Starter to Unlimited at any time. The remainder of your term on the Starter plan gets terminated, and we'll start you on a new 12-month term.
For more plan comparisons and pricing information, see the calculator on our corporate actions page.
Plans and live data
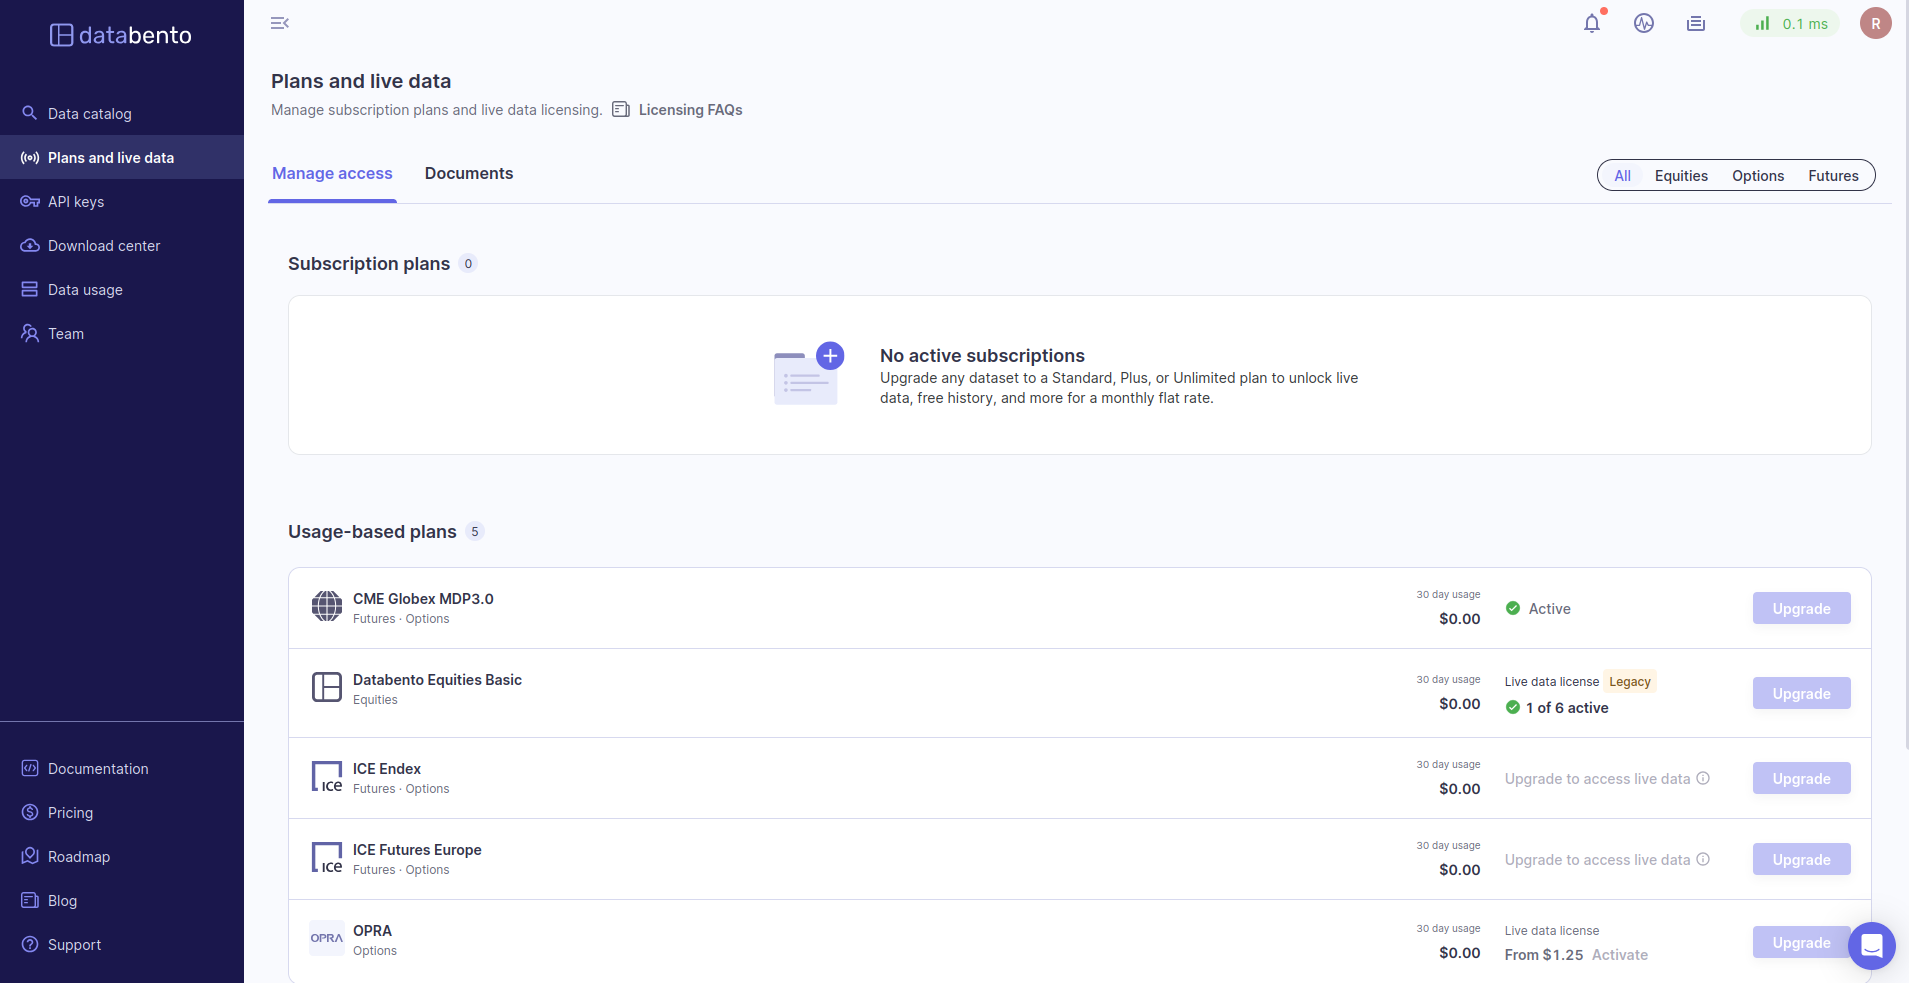
Overview
As a licensed distributor for 60+ trading venues, Databento redistributes real-time and intraday market data from the last 24 hours. The Plans and live data page of your portal allows you to manage your subscription plans and live data licensing.
Activate live data
InfoReal-time data is included with a Standard, Plus, or Unlimited plan. View our pricing page to explore live access by dataset.
- Navigate to the Plans and live data page of your Databento portal.
- Sign up for a qualifying subscription.
- Complete a short questionnaire for your desired dataset to determine your subscriber status. You can also upload an existing license agreement.
Instant approval is available for certain venues and use cases. Your contracts will be auto-generated to meet venue licensing requirements, and you can view clear pricing breakdowns before signing your documents. Databento will then operate as a vendor of record (VoR) and report your devices under our license agreement.
Venue licensing requirements
Each venue defines subscriber statuses, use cases, device counts, and their corresponding license fees differently. License fees refer to any monthly charges imposed by venues for the internal and external use (display, non-display, and distribution) of live market data for personal or commercial applications.
- Internal. Any use of market data within the licensed company or individual user's private environment.
- External. Any use of market data that involves sharing, disseminating, or making data visible to external parties outside the licensed organization or individual.
- Personal. Market data is used solely for a non-professional individual's own investment decisions, research, or educational purposes and cannot be shared or leveraged for profit.
- Commercial. Market data is used within a company, by a professional individual, or in applications that generate profit, serve clients, or support business operations.
Databento standardizes venue terminology to streamline licensing workflows. See the table below for general definitions and examples.
| Display use | Market data is shown ("displayed") in a human-readable, visible, or audible format on a terminal, screen, or other device internally. Internal use for personal or commercial applications. |
| Non-display use | Market data is used without being displayed in a human-readable format, such as being processed directly by a device. This includes algorithmic trading (e.g., automated order or quote generation), internal analytics, or other non-public backend applications. Note that some venues don't automatically consider API use as a non-display use case. Internal use for a commercial application. Some venues support personal non-display use. |
| Distribution | Market data is shared or distributed to external users, e.g., raw data feeds on a white-labeled API or displaying real-time quotes on a customer-facing web app. Real-time distribution is typically within 10 minutes of receipt, while delayed distribution is at least 10 minutes after receipt and before the end of the trading session. Cutoff times may vary by venue. External use for a commercial application. |
See alsoDatabento's market microstructure guide or three-part licensing FAQ series for more information and examples.
Applying for a license agreement
Most commercial users* without an existing license will need to apply for a direct license agreement with the venue before they can access live data on Databento or via any other data vendor.
Databento facilitates this process for you. To get started, click Activate live data on Plans and live data page and complete the license questionnaire.
- Start the application by completing the form.
- Databento will use this information to submit a data feed request (DFR) to the venue on your behalf.
- The venue will contact you via email to complete any additional paperwork and confirm license fees.
- Databento will receive approval from the venue and activate live data on the effective date of your license agreement.
Info*IEX TOPS, ICE Europe Commodities, ICE Europe Financials, ICE Endex, and ICE Futures US offer instant access for commercial use cases.
Venue license fees
License fees are assessed by the venue and are typically charged per user or device each month. If you're licensed through Databento, fees are passed through without an upcharge. However, a 2.9% Stripe processing fee is applied to license fees. These are paid monthly in advance, and you can terminate at any time.
This table summarizes 2026 license fees per dataset, alongside an overview of each venue's supported applications and a link to its official fee schedule. The monthly license fees listed below reflect the most common use cases among Databento users.
| Dataset | Supported applications | Monthly license fees |
|---|---|---|
| Blue Ocean ATS MEMOIR Depth | Commercial | $1,500/firm (display) $5,000/firm (non-display) $1,500 distribution + $8/user |
| CFE | Personal | Included with Standard plan |
| Commercial | $750/firm (display or non-display) $750 distribution + $3/personal user or $17/commercial user |
|
| CME | Personal | Included with Standard plan (up to 2 devices) |
| Commercial | $973/exchange $2,170 distribution + $35.40/personal user or $119.80/commercial user |
|
| EEX (Plus) | Personal and commercial | €0/team (display or non-display) |
| EEX (Unlimited) | Personal and commercial | €3,777/team (display or non-display) |
| Eurex | Personal | Included with Standard plan (up to 2 devices) |
| Commercial | €1,817/firm (non-display) €3,074.00 distribution |
|
| ICE Europe Commodities | Personal and commercial | $865/location + $144/terminal (display or non-display) |
| ICE Europe Financials | Personal and commercial | $740/location + $123/terminal (display or non-display) |
| ICE Endex | Personal and commercial | $865/location + $144/terminal (display or non-display) |
| ICE Futures US | Personal and commercial | $795/location + $132/terminal (display or non-display) |
| Databento US Equities Mini | Personal and commercial | No license fees |
| Nasdaq Basic with NLS Plus | Commercial only | $1,680/firm + $14.10/user (display or non-display) $2,140 distribution + $0.50/personal user or $14.10/commercial user |
| Nasdaq TotalView-ITCH | Commercial only | $1,690/firm + $84.00/user (display or non-display) $4,230 distribution + $15.00/personal user or $84.00/commercial user |
| NYSE Texas Integrated | Commercial only | No license fees |
| NYSE National Trades and BBO | Commercial only | No license fees |
| NYSE Order Imbalances | Commercial only | $2,500/firm (non-display) $0 distribution |
| NYSE Arca Order Imbalances | Commercial only | $1,000/firm (non-display) $0 distribution |
| NYSE American Order Imbalances | Commercial only | $1,000/firm (non-display) $0 distribution |
| Cboe EDGX Depth | Commercial only | $1,500/firm + $2,500 distribution |
| OPRA | Personal | $1.25/display or non-display device |
| Commercial | $2,000/firm (display or non-display) $1,500 distribution + $1.25/personal user or $31/commercial user |